The 2010 Toyota Prius utilizes two distinct fuse boxes to manage the electrical components throughout the vehicle. Understanding their locations and the functions of each fuse is crucial for troubleshooting electrical issues. This guide provides comprehensive diagrams and tables detailing both the engine compartment fuse box and the left side instrument panel fuse box for the 2010 Prius.
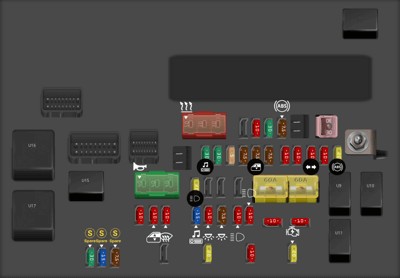
Engine Compartment Fuse Box
This fuse box is typically located near the battery in the engine compartment. It houses high-amperage fuses responsible for critical systems like the engine cooling fan, anti-lock brakes (ABS), and the hybrid system’s inverter and converter.
| Type | No. | Description |
|---|---|---|
| Fuse MPF2 | 1 | Air Conditioning System (HTR) |
| Fuse MPF2 | 2 | Electric Cooling Fans (RDI) |
| Fuse MPF2 | 3 | Electric Cooling Fans (CDS) |
| Fuse MINI 10A | 4 | Not Used (S-HORN) |
| Fuse MINI 30A | 5 | Cooling System (ENG W/P) |
| Fuse MINI 7.5A | 6 | Anti-lock Brake System (ABS MAIN NO.2) |
| Fuse FMX/JCase 30A | 7 | Headlight Cleaner (H-LP CLN) |
| Fuse MINI 30A | 8 | Audio System (AMP) |
| Fuse MINI 30A | 9 | PCU, IGCT NO.2, IGCT NO.3 (IGCT) |
| Fuse MINI 5A | 10 | Inverter and Converter (DC/DC-S) |
| … | … | … |
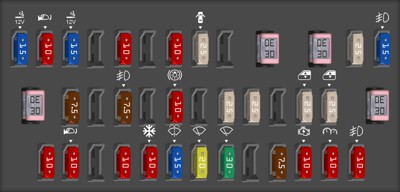
Left Side Instrument Panel Fuse Box
Located on the driver’s side, typically beneath the dashboard or behind a panel, this fuse box manages lower amperage circuits for components like interior lighting, power windows, and the audio system. Accessing this fuse box may require removing a panel or consulting your owner’s manual.
| Type | No. | Description |
|---|---|---|
| Fuse MINI 15A | 1 | Power Outlets (CIG) |
| Fuse MINI 10A | 2 | Multiplex Communication System, Outside Rear View Mirrors, Driver Support System, Audio System, Navigation System (ECU-ACC) |
| Fuse MINI 15A | 3 | Power Outlets (PWR OUTLET) |
| Fuse MINI 10A | 5 | Seat Heater (SEAT HTR FR) |
| Fuse MINI 10A | 7 | Seat Heater (SEAT HTR FL) |
| … | … | … |
Locating Specific Fuses
Both diagrams provide fuse numbers corresponding to their specific functions. Using the tables, you can quickly identify the fuse associated with a malfunctioning component. For example, if your headlights are not working, you would consult the diagrams and tables to find the fuses labeled “H-LP” (Head Lamp) to check for a blown fuse. Always ensure the vehicle is off and the ignition key is removed before inspecting or replacing any fuses.
Replacing a Blown Fuse
When replacing a blown fuse, it’s critical to use the correct amperage rating. Using a fuse with a higher amperage can lead to electrical damage and potential fire hazards. Always replace a blown fuse with one of the same type and amperage. Refer to your owner’s manual or the markings on the fuse box cover for the correct fuse specifications.
Conclusion
This guide provides a detailed overview of the 2010 Prius Fuse Box Diagrams, enabling you to confidently troubleshoot basic electrical issues. Remember always to consult your owner’s manual for the most accurate and up-to-date information specific to your vehicle. If you encounter complex electrical problems or are unsure about performing any repairs, it’s recommended to seek professional assistance from a qualified automotive technician.