Changing your transmission fluid is crucial for maintaining the health of your 2016 Chevy Traverse. This guide provides a step-by-step walkthrough of a partial fluid change, perfect for DIY enthusiasts. This process drains and replaces a portion of the old fluid, helping to extend the life of your transmission.
Partial Transmission Fluid Drain and Refill for Your Chevy Traverse
A complete transmission fluid flush requires specialized equipment, but a partial drain and refill is a manageable DIY project that can significantly improve your Traverse’s performance. Remember, this process only replaces a portion of the fluid, as some remains in the torque converter, lines, and cooler. Repeating this process a few times over several hundred miles will gradually replace a larger percentage of the old fluid.
Gathering Your Supplies
Before you begin, assemble the following tools and materials:
- Dexron VI Transmission Fluid: Approximately 5-6 quarts.
- Drain Pan: A large container (at least 5 quarts) to collect the old fluid.
- Wrench or Socket: 7/16″ size to remove the drain plug.
- Funnel: A long-necked funnel to easily add new fluid.
- Plastic Sheeting and Cardboard: To protect your work area and make cleanup easier.
- Marker: To mark the fluid level on the new bottles and the position of the drain plug.
- Gloves and Rags: To keep your hands and work area clean.
Locating and Draining the Fluid
The transmission drain plug on the 2016 Chevy Traverse is relatively accessible. You may not even need to raise the vehicle.
- Safety First: Engage the parking brake and chock the wheels for safety.
- Locate the Drain Plug: The drain plug is situated on the transmission pan, typically towards the rear of the vehicle.
- Position the Drain Pan: Place the drain pan beneath the drain plug.
- Remove the Drain Plug: Using the 7/16″ wrench or socket, carefully loosen and remove the drain plug. Let the old fluid drain completely.
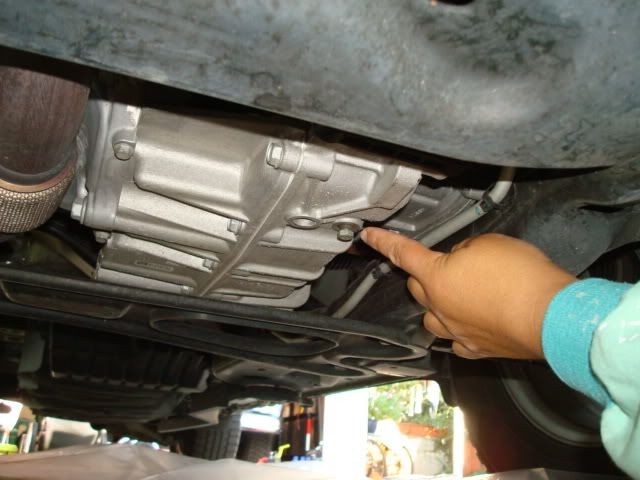 Transmission drain plug location
Replacing the Drain Plug and Refilling
Once the fluid has finished draining, it’s time to replace the plug and refill with fresh fluid.
-
Inspect the Drain Plug: Check the condition of the drain plug and its threads. Ensure the thread sealer is still intact.
-
Reinstall the Drain Plug: Replace the drain plug, tightening it to the manufacturer’s specified torque. Using a marker to align the plug to its original position can be helpful.
-
Add New Fluid: Using the funnel, carefully pour 5 quarts of new Dexron VI transmission fluid into the transmission dipstick tube.
-
Check the Fluid Level: With the engine running and the transmission in park, check the fluid level using the dipstick. Add more fluid if necessary to reach the “Full” mark on the dipstick.
Checking for Debris and Fluid Color
Inspecting the drained fluid can offer insights into the condition of your transmission.
-
Look for Debris: Examine the drained fluid for any metal shavings or debris, which could indicate potential problems within the transmission.
-
Compare Fluid Color: Compare the color of the old fluid to the new fluid. Dark or burnt-smelling fluid suggests the need for more frequent fluid changes.
Completing the Process
After refilling, double-check the fluid level and ensure there are no leaks. Drive the vehicle for a few hundred miles and then repeat the drain and refill process. This will help further dilute the remaining old fluid. Regular maintenance will contribute to a longer lasting and smoother-running transmission.