For professionals dedicated to canine safety in vehicles, systems like the K9 Hot-N-Pop® PRO and K9 Heat Alarm® PRO from AceK9 are essential. These advanced systems offer features like remote door opening and critical temperature monitoring to protect K9 units. A key component of these systems is the remote control, and understanding how to program or reprogram it is crucial for seamless operation. While specific programming instructions can vary depending on the exact model and system, this guide will provide general steps and considerations for programming a K9 car alarm remote, ensuring your focus remains on your canine partner’s well-being.
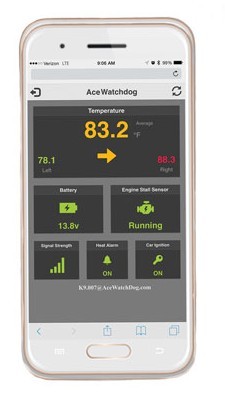 AWD Screen
Understanding Your K9 Car Alarm System and Remote
Before attempting to program your remote, it’s important to understand the system you are working with. AceK9 has been a leader in canine vehicle safety equipment since 1986, offering patented products designed for reliability and ease of use. Their systems typically include a control module in the vehicle and one or more remote controls for handlers.
The K9 HOT-N-POP® PRO, for example, is described as a sophisticated system with features like Dual Temperature Sensors, Engine Stall Monitor™, and Vehicle Battery Sentinel™. It uses a remote to activate the K9 DOOR POPPER®, unlocking and opening the vehicle door with a single button press. The K9 HEAT ALARM® PRO focuses on temperature monitoring and alerts, potentially integrating with the same or similar remote system for user interaction.
General Steps to Program a K9 Car Alarm Remote
Programming a car alarm remote generally involves putting the system into a ‘programming mode’ and then transmitting a signal from the remote to be learned by the system. Here are typical steps, but always refer to your specific system’s manual for precise instructions:
-
Locate the Programming Instructions: The most reliable source for programming instructions is the user manual that came with your AceK9 system. Look for a section specifically detailing remote programming or remote pairing. If you don’t have the manual, check the AceK9 website or contact their customer support for assistance.
-
Enter Programming Mode: This usually involves a combination of actions performed inside the vehicle. Common methods to enter programming mode include:
- Ignition Cycling: Turning the ignition key ON and OFF a specific number of times in a defined sequence.
- Programming Button: Some systems have a dedicated programming button, often located on the control module itself or in an accessible location within the vehicle (check under the dash or near the fuse box).
-
Press the Remote Button: Once the system is in programming mode (which might be indicated by a light flashing or a sound), you will typically need to press a button on the remote you want to program. This transmits a code to the control module.
-
Confirm Programming: The system usually provides a confirmation signal, such as a light flash, horn chirp, or a specific sound, to indicate that the remote has been successfully programmed.
-
Test the Remote: After programming, test all the functions of the remote (door pop, alarm features, etc.) to ensure it is working correctly with your K9 car alarm system.
Important Considerations and Troubleshooting
- Specific Instructions are Key: The steps above are general guidelines. Always prioritize the specific instructions provided in your AceK9 system’s manual. Different models and versions may have unique programming procedures.
- Battery Condition: Ensure the batteries in your remote are fresh and functioning. Low batteries can sometimes prevent successful programming.
- System Malfunctions: If you are unable to program the remote, there could be an issue with the system itself. Contact AceK9 customer support or a qualified automotive electronics technician for further diagnosis.
- “Forget Me Not” Feature: AceK9 systems often include features like “Forget Me Not” CAR ON / MANUAL OFF. This is a safety feature, not directly related to remote programming, but it’s important to understand its operation for overall system management. Ensure programming the remote doesn’t inadvertently affect other system settings, and always re-familiarize yourself with all features after any programming changes.
Conclusion
Programming your K9 car alarm remote is a task that ensures you maintain control and functionality over your canine safety system. By understanding the general process and, most importantly, consulting your AceK9 system’s manual for specific instructions, you can effectively manage your remotes. Regularly testing your remote and understanding the features of your K9 safety system contributes to the overall safety and well-being of your canine partner. For detailed support and model-specific guidance, always refer to AceK9’s official documentation and support channels.