Imagine the convenience of opening your gate without fumbling for a separate remote. Programming your gate opener to your car’s built-in system offers exactly that – a seamless entry experience right from your vehicle. This guide will walk you through the process of programming your gate remote and integrating it with your car, enhancing both convenience and security for your property.
Understanding Gate Remote Programming Basics
Before we dive into the steps, let’s understand the fundamentals of gate remote programming. Essentially, you’re teaching your gate opener’s receiver to recognize the signal from your remote. This creates a secure communication link that allows you to control your gate remotely.
There are two key components in this process:
- Receiver Unit: This is the device attached to your gate that receives signals from the remote. It acts as the brain, interpreting the remote’s signals to operate the gate motor.
- Remote: The handheld device that transmits signals to the receiver, instructing it to open or close the gate.
Programming is crucial because it establishes a unique and secure connection. Without proper programming, your remote won’t communicate with your gate, and you’ll lose the convenience of remote operation.
Why is Gate Remote Programming Important?
Properly programmed gate remotes are essential for reliable access control, boosting both security and convenience:
- Enhanced Security: Programming allows you to set unique codes, ensuring only authorized individuals can operate your gate. This personalized access control adds a significant layer of security to your property.
- Convenience and Customization: Beyond basic operation, programming unlocks customization options. You can often set opening and closing delays, useful for longer driveways or timed operations. Some systems even allow for time-based access restrictions, further enhancing security.
- Adaptability: Programming isn’t a one-time task. As your needs evolve – adding new users or changing security codes – understanding the programming process empowers you to make adjustments easily and confidently.
Now that we understand the importance, let’s gather the tools needed for programming your gate remote.
Tools You’ll Need to Program Your Gate Remote
Gathering the right tools beforehand ensures a smooth and efficient programming process. Typically, you’ll need:
- Screwdriver: To access the receiver unit and battery compartment of your remote.
- Ladder (potentially): If your receiver unit is located high up, especially common with garage door openers.
- New Batteries (optional): If your remote is older, fresh batteries can prevent issues during programming.
- Gate Remote User Manual: This is the most crucial tool! It provides model-specific instructions and troubleshooting tips.
Some gate openers might have specific requirements, like a programming adapter. Always consult your user manual for detailed instructions and any additional tools needed for your specific model. Preparation is key to a successful programming experience.
Step-by-Step Guide to Program Your Gate Remote
Let’s walk through the programming process. While specific steps can vary by model, these general guidelines will help you program your gate remote.
Step 1: Identifying Your Gate Remote Model
The first crucial step is identifying your exact gate remote model. Programming methods differ between models, so accurate identification is essential.
- Check the User Manual: Your user manual should clearly state the model number.
- Manufacturer’s Website: Look for markings on the remote itself, then check the manufacturer’s website for model details and programming instructions.
- Contact Support: If you’re unsure, emailing a picture of your remote to a gate remote specialist can help identify it and find suitable replacements or instructions.
Once you know your model, you can find the correct programming instructions. Let’s look at common methods for different types of remotes.
Step 2: Programming Fixed-Code Gate Remotes with Dip Switches
Fixed-code remotes, often using dip switches, are an older but still common type. Brands like Multicode and Linear frequently use dip switches. Here’s how to program them:
- Locate the Receiver Unit: Find the receiver box near your gate or within the gate opener. It might have an antenna wire.
- Find Receiver Dip Switches: Open the receiver unit to locate the dip switch panel.
- Find Remote Dip Switches: Open your remote to access its dip switches, often near the battery compartment.
- Match Dip Switch Positions: Set the dip switches in your remote to exactly match the pattern of the dip switches in the receiver unit.
- Change the Code (Optional): To create a new code, change the dip switch positions on both the receiver and the remote to a new, matching pattern.
- Programming Complete: That’s it! Dip switch programming is usually this straightforward.
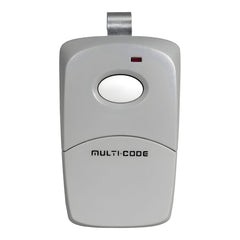
Alt text: Multicode 3089 dip switch gate remote for programming, showcasing a common fixed-code remote.
Alt text: Linear DT1 dip switch gate remote, another example of a fixed-code remote requiring dip switch matching for programming.
Step 3: Programming Rolling Code Gate Remotes
Rolling code remotes offer enhanced security by changing the code each time the remote is used. Programming these is slightly different:
- Locate the Receiver Unit: As with dip switch remotes, find the receiver near your gate opener.
- Find the “Program” or “Learn” Button: Look for a button labeled “Program,” “Learn,” or similar on the receiver unit.
- Press the Program Button: Press and release the program button on the receiver. An LED indicator light should turn on, signaling it’s in programming mode.
- Press Remote Button: Immediately press and hold the button you want to use on your gate remote.
- Programming Complete: The LED light on the receiver usually blinks or turns off to indicate successful programming.
Alt text: LiftMaster 892LT rolling code gate remote, demonstrating a typical remote for rolling code programming.
Alt text: Hand holding an EG642 rolling code gate remote, highlighting the user interaction during the programming process.
Step 4: Testing Your Programmed Remote
After programming either type of remote, always test it!
- Stand within Range: Position yourself within the expected operating range of your gate.
- Press the Programmed Button: Press the button you programmed on your remote.
- Verify Gate Operation: Ensure the gate opens and closes as expected. If it works, congratulations! You’ve successfully programmed your gate remote. If not, re-check your steps and consult the troubleshooting section or your manual.
Integrating Your Gate Remote with Your Car
Now for the added convenience – programming your gate opener to your car’s built-in system. Before starting, consult your vehicle’s owner’s manual for specific instructions on programming garage door openers or home automation systems.
Generally, car integration involves these steps:
- Enter Car Programming Mode: This usually involves pressing and holding one or two buttons in your car (often on the rearview mirror or visor) until an indicator light blinks differently, signaling programming mode. Some cars may require clearing existing codes first (often by holding two outer buttons for an extended period).
Programming a Dip Switch Remote to Your Car
- Ensure Remote Works: Verify your dip switch remote is functioning correctly with the gate itself.
- Position Remotes: Hold your gate remote close to the button in your car you want to program.
- Press and Hold Both Remotes: Simultaneously press the button on your gate remote and the chosen button in your car until the car’s indicator light changes (usually blinks rapidly or becomes solid), indicating successful programming.
- Test: Test the programmed button in your car to operate your gate.
Programming a Rolling Code Remote to Your Car (Two-Step Process)
Rolling code car integration often requires a two-step “learning” process:
- Ensure Remote Works: Confirm your rolling code remote works with the gate.
- Position Remotes & Initial Car Programming: Hold your gate remote near the car button you want to program. Press and hold both the remote button and the car button until the car’s indicator light changes.
- Receiver “Learn” Mode: Go to your gate opener receiver and press the “Program” or “Learn” button (as you would when programming a new remote directly to the gate). The LED light on the receiver should illuminate.
- Final Car Programming: Return to your car and press and hold the programmed button in your car until the car’s indicator light changes again (and the gate may activate). This completes the rolling code learning process.
- Test: Test the car button to ensure it now operates your gate.
Troubleshooting Common Programming Issues
Encountering problems? Here are common issues and tips:
- Remote Not Syncing: Double-check battery strength, ensure you’re in range, and meticulously re-follow the programming steps for your remote type and model.
- LED Not Blinking (Receiver/Car): Ensure you are pressing the correct buttons for the correct duration and in the right sequence. Refer to your manuals.
- Gate Not Responding: Test your gate with another known working remote (if available). If still unresponsive, the issue might be with the gate opener itself, not just the remote programming.
- Factory Reset: If all else fails, some remotes and car systems have factory reset procedures (check manuals) to start fresh.
Benefits of Adding Your Gate Remote to Your Car
Integrating your gate remote with your car provides significant advantages:
- Ultimate Convenience: No more searching for a separate remote! Gate control is always at your fingertips, built into your vehicle.
- Reduced Clutter: Eliminate extra remotes on your keychain or visor, streamlining your car’s interior.
- Enhanced Security and Speed: Quicker, easier gate access improves security by reducing wait times at the gate entrance.
Compatibility Check: Car and Gate Remote
While many modern cars have built-in systems compatible with gate openers, always check compatibility:
- Car Owner’s Manual: Consult your car’s manual for information on garage door opener or home automation compatibility.
- Gate Opener/Remote Specs: Some gate opener systems might have compatibility limitations with certain car brands or systems.
- Professional Consultation: If unsure, consult a car audio/electronics specialist or a gate opener technician to confirm compatibility and get expert advice.
Maintaining Your Programmed Gate Remote
Proper maintenance ensures long-term reliable operation of your programmed gate remote.
Regular Check-ups for Your Gate Remote
- Battery Inspection: Regularly check the battery compartment for corrosion or damage.
- Battery Replacement: Replace batteries proactively, especially if you notice decreased range or responsiveness. Use the correct battery type as specified in your manual.
- Cleanliness: Keep the remote exterior and buttons clean from dirt and debris.
Dealing with Battery Issues
- Responsiveness Issues: Weak or dying batteries are the most common cause of remote problems. Replace batteries immediately if you notice reduced range or inconsistent operation.
- Correct Battery Type: Always use the battery type recommended in your user manual to avoid damage or malfunction.
Conclusion
Programming your gate opener to your car is a worthwhile upgrade for convenience and security. By following this guide and your specific product manuals, you can enjoy seamless gate access directly from your vehicle. Remember to maintain your remote for continued reliable performance. Happy programming and enjoy the ease of integrated gate control!
For a wide selection of gate remotes, visit: https://elitegates.net/collections/remote-controls