For homeowners seeking seamless access, the LiftMaster 8500 garage door opener stands out with its user-friendly features, especially remote operation. Programming your car’s remote to your garage door opener enhances convenience, allowing you to open or close your garage door without fumbling for a separate remote. The LiftMaster 8500 streamlines this process with its conveniently located LEARN button.
But where is this LiftMaster 8500 LEARN button, and how exactly can you use it to program your car’s remote?
Unlike traditional garage door openers where the LEARN button is situated on the motor unit itself, the LiftMaster 8500 features a more accessible design. The LEARN button is integrated into the door control or myQ control panel, eliminating the need to access the opener unit mounted in your garage. This smart upgrade simplifies the programming of compatible devices, including your car remote, right from the wall-mounted control panel.
This innovative placement makes adding new remotes, keyless entries, and myQ devices incredibly easy and convenient.
Understanding the LEARN Button on Garage Door Openers
Most modern garage door openers are equipped with a LEARN or Program button, a crucial component for setting up various accessories. This technology allows users to:
- Program remote controls: Pair new remotes or car remotes to operate the garage door.
- Clear motor memories: Erase previously programmed devices for security purposes.
- Reprogram new controllers: Set up replacement remotes or keypads.
- Set travel limits and force: Configure the operational parameters of the garage door (though the LiftMaster 8500 uses a separate yellow button for these adjustments).
In standard garage door openers, the LEARN button is typically found inside the motor unit, often near the light cover on the back. It’s usually positioned above the antenna. However, locations can vary by model, so consulting your manufacturer’s guide is always recommended.
LEARN buttons come in different shapes (square or round) and colors. These colors aren’t just for aesthetics; they indicate the operating frequency or radio signal of the opener. For compatibility, the color of your LEARN button must match the color specified on your remote control or accessory. This color-coding system ensures that devices are communicating on the same frequency.
The LiftMaster 8500: A Modern Garage Door Opener
The LiftMaster 8500 is a wall-mounted garage door opener renowned for its space-saving design and advanced features. It’s a popular choice for modern garages, offering a blend of security and convenience. Key features include:
- Wall-Mount Design: Freeing up ceiling space, ideal for garages with storage needs or low headroom.
- myQ Technology: Enables smartphone control and monitoring of your garage door from anywhere.
- Rolling Code Technology: Enhances security by changing the access code with each use, preventing unauthorized access.
- Battery Backup: Ensures operation even during power outages.
- Security Features: Includes a power lock deadbolt, timer-to-close, and safety sensors.
- Capacity: Can accommodate up to 40 remote controls, 4 wireless keyless entries, and 16 myQ devices, offering ample capacity for families and multiple vehicles.
The LiftMaster 8500 is compatible with garage doors that utilize a spring and torsion bar system, including standard lift and high lift sectional doors.
Locating the LEARN Button on the LiftMaster 8500
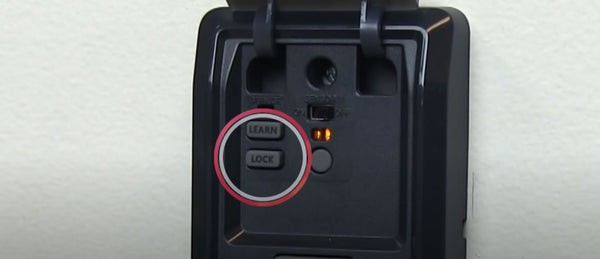
The LiftMaster 8500 distinguishes itself with the placement of its LEARN button. Instead of being on the garage door opener unit itself, the LEARN button is located on the door control panel, often referred to as the myQ control panel.
On the control panel, the LEARN button is clearly labeled “LEARN,” making it easily identifiable. This button is your primary interface for programming car remotes, keypads, and myQ accessories to your LiftMaster 8500 opener.
It’s worth noting that the yellow button located on the LiftMaster 8500 unit itself serves a different purpose. This yellow button is used for setting the travel limits and force adjustments of the garage door, not for programming remote devices.
Step-by-Step Guide: Programming Your Car Remote to LiftMaster 8500
Programming your car remote to your LiftMaster 8500 garage door opener is a straightforward process thanks to the accessible LEARN button on the control panel. Whether you’re setting up a new car remote or integrating your car’s built-in HomeLink system, these steps will guide you.
For many LiftMaster 8500 setups, a 3-button remote control model 893 MAX is often pre-programmed from the factory for immediate use. However, to program your car’s remote, or add additional remotes or keyless entries, follow these simple instructions:
Programming Your Car Remote (and Keyless Entry):
- Activate LEARN Mode: Press the “LEARN” button on the door control panel twice (do not hold). The red LED light next to the LEARN button will illuminate, indicating that the opener is in learning mode.
- Prepare Your Car Remote: Locate the button on your car’s built-in remote system (like HomeLink) or your aftermarket car remote that you wish to program to the garage door opener.
- Transmit Signal: Press and hold the chosen button on your car remote.
- Confirmation: Observe the garage door opener light bulb. It will flash once (or you may hear two clicks from the opener unit) to confirm successful programming. Release the button on your car remote.
- Test: Press the programmed button on your car remote to ensure it now operates your garage door.
Programming myQ Devices:
The process for programming myQ accessories like remote light controls or light switches is similar:
- Enter LEARN Mode: Press the “LEARN” button on the control panel twice until the red LED light turns on.
- Activate myQ Device LEARN Button: Press the LEARN button on your myQ accessory (e.g., 825LM remote light control, 829LM monitor, or 823LM light switch).
- Confirmation: The garage door opener light will flash or click to indicate successful programming.
Connecting to the myQ Internet Gateway:
To enable smartphone control via the myQ app, you’ll need to link your control panel to the LiftMaster internet gateway (sold separately).
- Register and Login: Go to myliftmaster.com and register or log in to your account.
- Add Device: Click “Manage Places” > “Add New Device” > “Garage Door Opener” and follow the on-screen instructions.
- Activate LEARN Mode: Within three minutes of initiating the device addition on the website, press the “LEARN” button on your control panel twice until the red LED illuminates.
- Completion: The LED light will turn off upon successful programming, and your control panel name will appear in your myQ account.
Erasing Programmed Devices (Resetting the LEARN Button):
For security, you may need to erase programmed devices, especially when moving or if you suspect unauthorized access. The LEARN button also functions as a reset button:
- Erase Remotes and Keypads: Press and hold the “LEARN” button on the control panel until the LED light turns off. This will erase all programmed remote controls and keyless entries.
- Erase myQ Devices: Press and hold the “LEARN” button twice in succession. When the light goes off after the second hold, it indicates that myQ devices have been successfully removed from the memory.
Maximize Your Garage Door Convenience with LiftMaster 8500
The LiftMaster 8500 garage door opener, with its strategically placed LEARN button, simplifies the process of programming car remotes and other accessories. This user-friendly design, combined with advanced security and myQ connectivity, makes the LiftMaster 8500 an excellent choice for homeowners seeking convenience and modern technology in their garage door systems.
Explore compatible accessories and devices to further enhance your garage door system at All Security Equipment. Contact our customer service today to discover how we can help you optimize your garage access and security.