Welcome to the exciting world of smart robotics! As a content creator at carcodereader.store and your trusted car repair expert, I’m thrilled to guide you through the initial steps of setting up your OSOYOO Robot Car V4.0 for Raspberry Pi. This lesson focuses on the fundamental installation and programming needed to get your robot car moving, laying a solid foundation for more advanced projects.
This comprehensive guide is designed to be your go-to resource for understanding the basic setup of your Raspberry Pi-powered smart robot car. We’ll cover everything from assembling the hardware framework to installing the necessary software and running your first programs. By the end of this lesson, you’ll have a fully functional robot car capable of basic movements, ready for you to explore more complex functionalities and programs in future lessons.
Successfully completing the movement tests in this guide confirms that your Raspberry Pi, motors, battery, Model X board, OSOYOO PWM HAT, and all wiring connections are correctly installed and working efficiently. This foundational understanding is crucial before progressing to more intricate lessons and projects.
Let’s dive into the essential steps to bring your smart robot car to life!
Buy from US | Buy from UK | Buy from DE | Buy from IT | Buy from FR | Buy from ES | Buy from JP
I. Objective
In this introductory lesson, our primary objective is to guide you through the initial setup of your OSOYOO Robot Car V4.0. We will start with the physical assembly of the car framework, followed by the installation of Raspberry Pi OS, and conclude with writing basic programs to control the car’s movement. This step-by-step approach ensures you have a functional base to build upon for more sophisticated smart robot car programs.
II. Parts and Devices
Before we begin assembling and programming, let’s ensure you have all the necessary components. Below is a detailed list of parts included in your OSOYOO Robot Car V4.0 kit, along with any additional accessories you might need.
| No. | Picture | Device | Qty. | Accessories | Link |
|---|---|---|---|---|---|
| 1 | Raspberry pi board 2/3/4 (not in package) | 1 | M2.5 Plastic Screw x4 M2.5 Plastic Nut x2 M2.5 Plastic Pillar x4 M2.5*12 plastic pillars x2 | Click here to buy | |
| 2 | Pie car chassis | 1 | M3*45 pillars x 4 M3 *10 hex screws x8 M3 washer x 8 | Click here to buy | |
| 3 | Gear motor | 2 | Metal Motor Holders with screws x2 | Click here to buy | |
| 4 | Wheel | 1 | screws for wheels x2 | Click here to buy | |
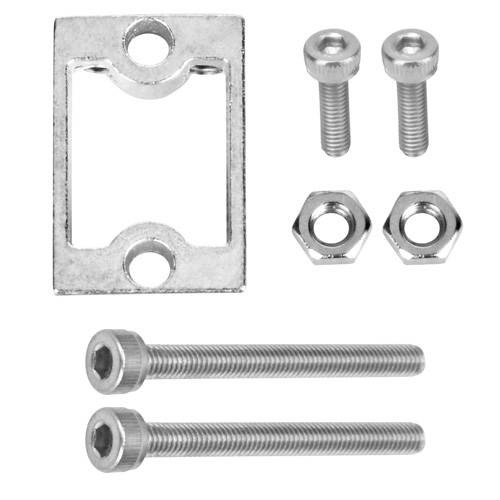
| 5 | Universal Wheel | 1 | M3 *10 hex screws x2 M3 nuts x2 | Click here to buy | |
| 6 | OSOYOO PWM HAT v1.0 | 1 | M2.5*12 plastic pillars x2 | Click here to buy | |
| 7 | OSOYOO model X motor driver module | 1 | M2.5 Plastic Screw x 4 M2.5 Plastic Nut x4 M2.5 Plastic Pillar x4 | Click here to buy | |
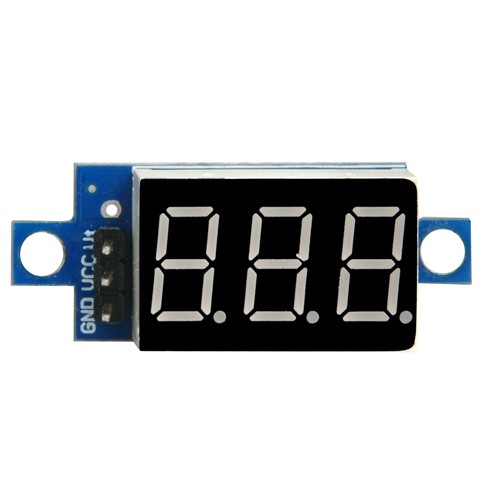
| 8 | Voltage meter | 1 | M2.5 Plastic Screw x 2 M2.5 Plastic Nut x2 M2.5 Plastic Pillar x 2 | Click here to buy | |
| 9 | 18650 battery case | 1 | M3*10 screw x4 M3 nuts x4 | Click here to buy | |
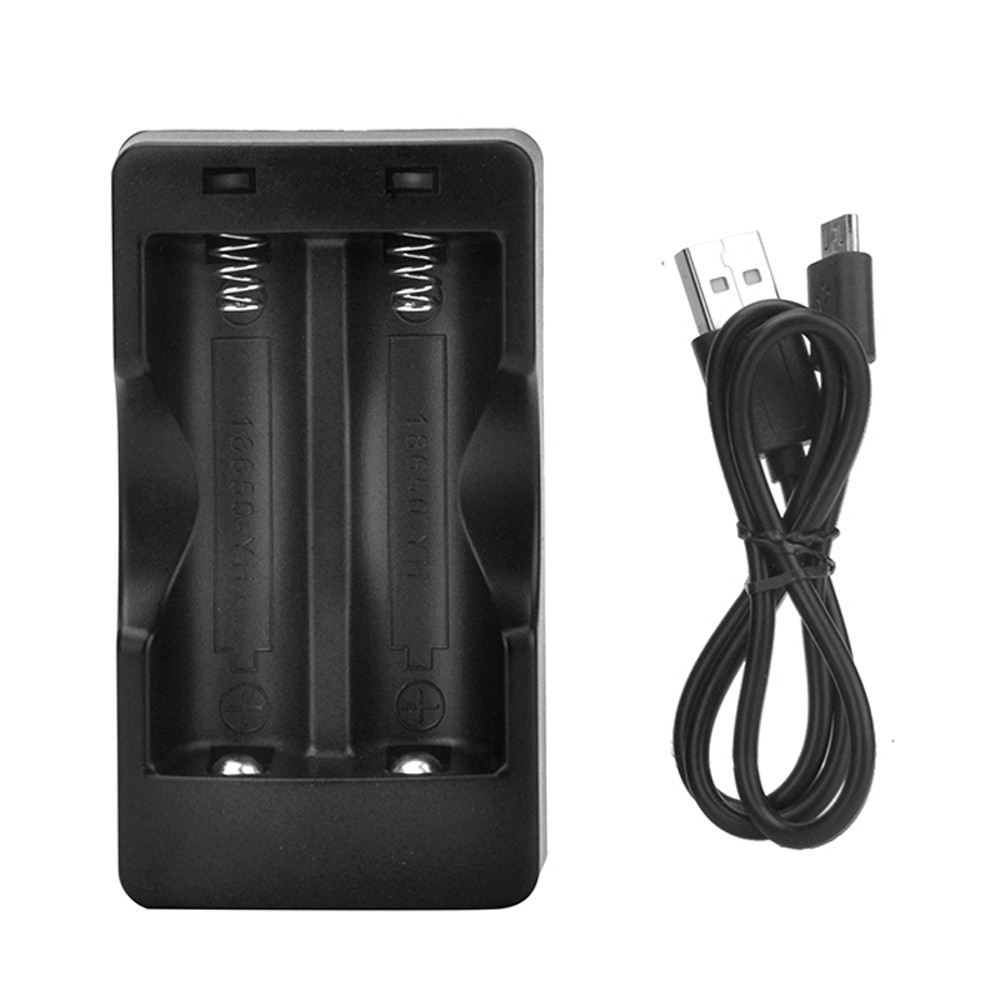
| 10 | 18650 battery charger | 1 | Click here to buy | ||
| 11 | 2000mAh 18650 rechageable battery | 1 | Click here to buy | ||
| 12 | Metal Motor Holders with screws | 2 | Click here to buy | ||
| 13 | 3pin female to 3pin female jumper wire | 1 | Click here to buy | ||
| 14 | OSOYOO 2pin PnP cable 20cm | 1 | Click here to buy | ||
| 15 | 6Pin female to female jumper wire | 1 | Click here to buy | ||
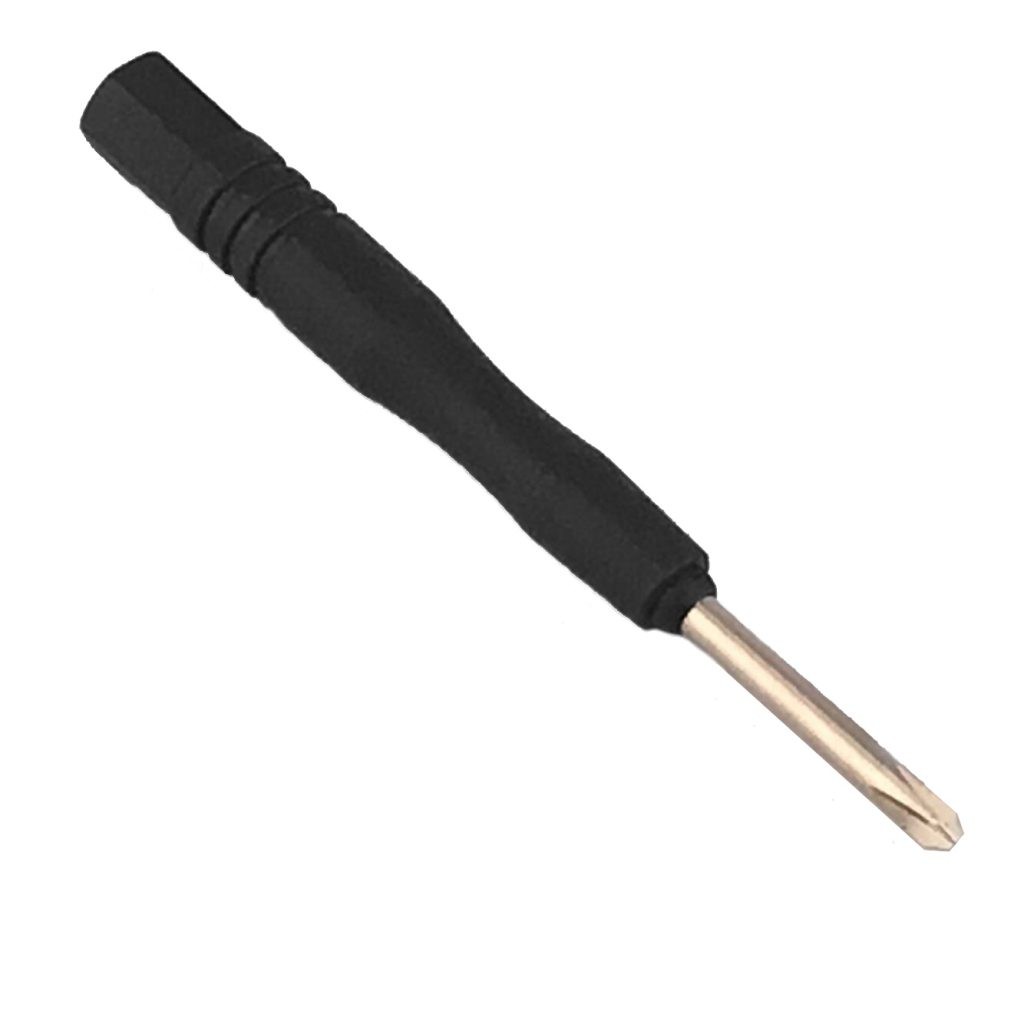
| 16 | Philips screwdriver | 1 | Click here to buy | ||
| 17 | Hex Screwdriver | 1 | Click here to buy |


Note: A Raspberry Pi board (Model 2, 3, or 4) is not included in the package and must be purchased separately.
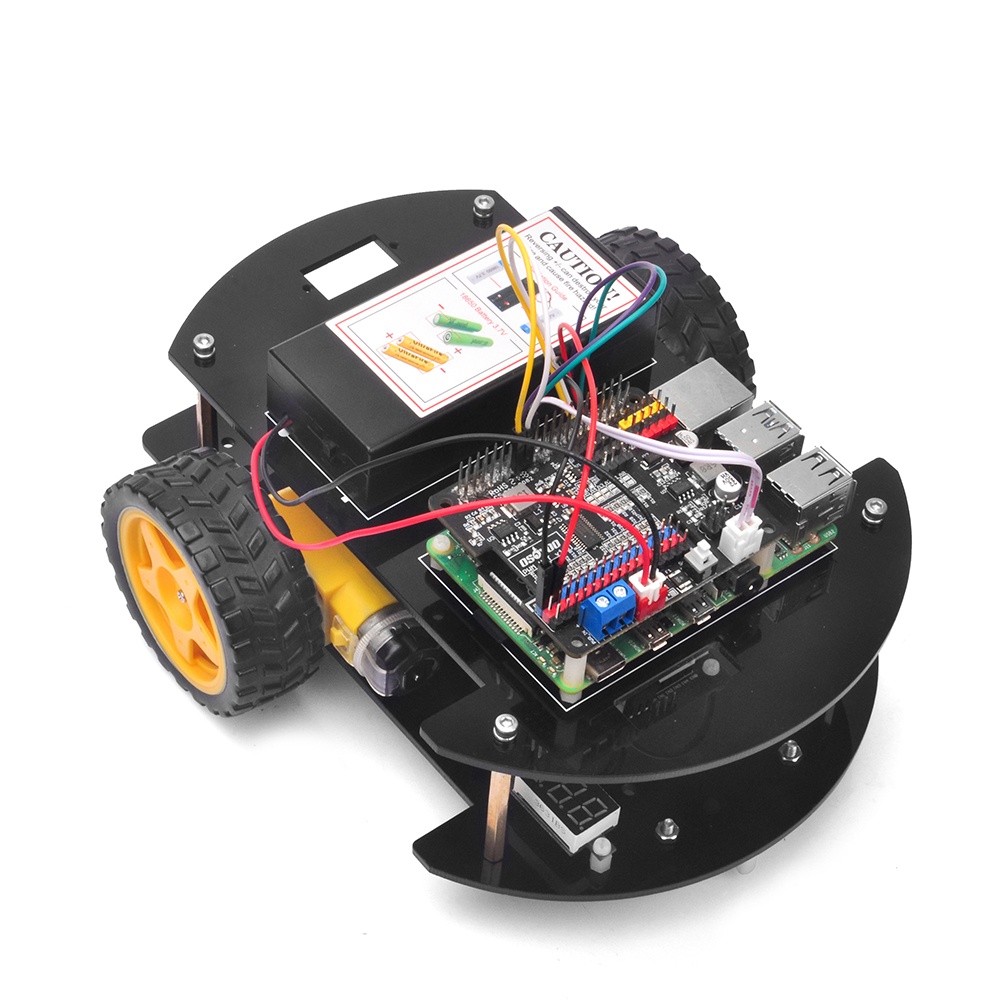
III. Hardware Installation
Follow these step-by-step instructions to assemble the hardware components of your OSOYOO Robot Car V4.0. Ensure you have the parts listed above and the provided screwdrivers for assembly.
-
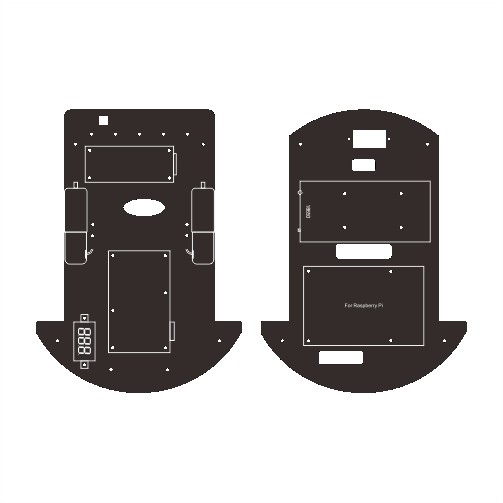
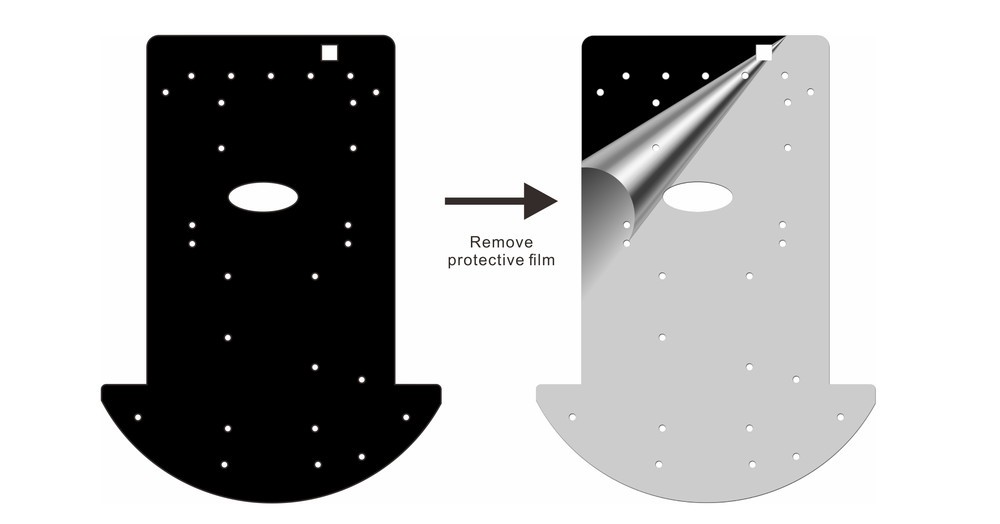
Chassis Preparation: Begin by removing the protective film from both the upper and lower car chassis components. Each chassis piece is covered with a protective film to prevent scratches during shipping.
-
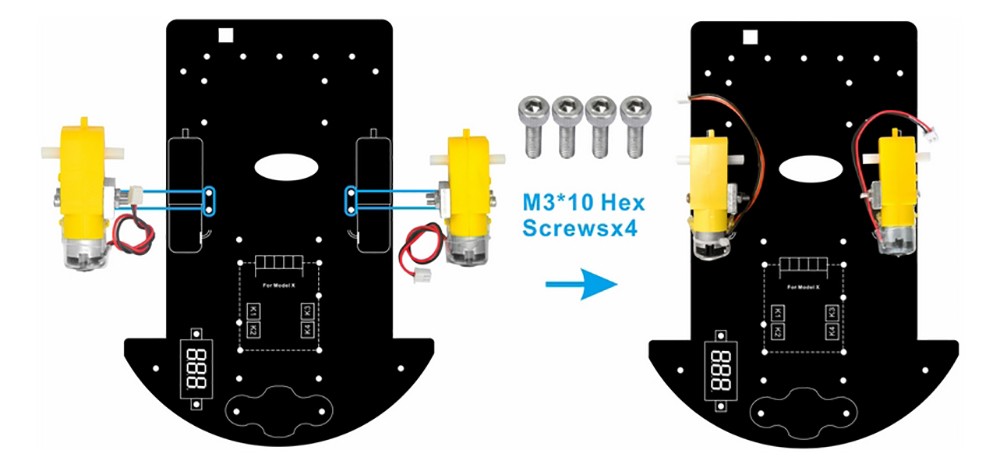
Motor Installation with Holders: Attach the metal motor holders to the two gear motors using the provided screws. These holders will secure the motors to the car chassis.
-
Mounting Motors to Lower Chassis: Securely mount the motors with the attached holders onto the lower car chassis using M3*10 screws. If you find the screws loosen easily, adding M3 washers between the screws and the chassis can provide a more secure fit.
-
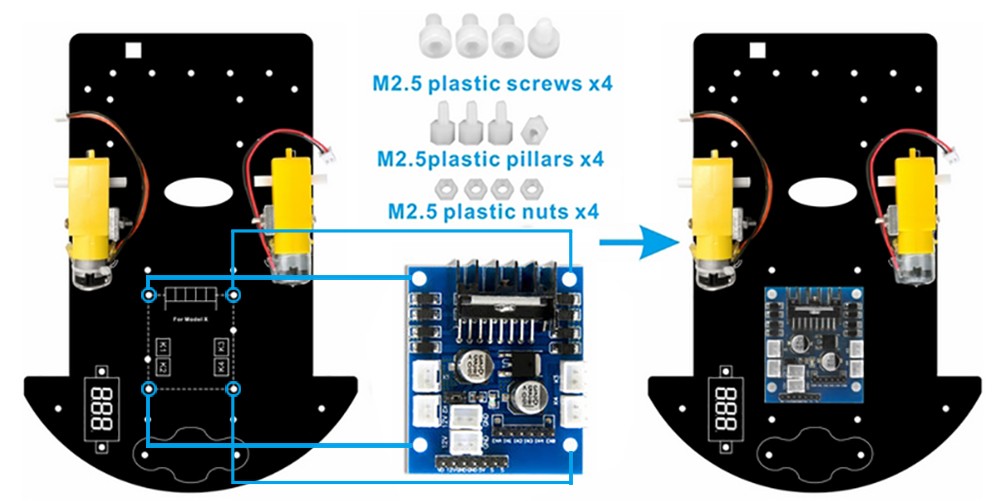
Installing the Motor Driver Module: Place the OSOYOO MODEL X motor driver module onto the lower car chassis. Use 4pcs of M2.5 plastic screws, plastic pillars, and plastic nuts to securely mount it. Pay close attention to the direction of the module to ensure correct installation.
-
Voltage Meter Installation: Install the voltage meter on the lower car chassis using 2pcs of M2.5 plastic screws, plastic pillars, and plastic nuts. This meter will allow you to monitor the battery voltage of your robot car.
-
Universal Wheel Attachment: Attach the universal wheel to the underside of the lower car chassis. Use 2pcs of M3x10 hex screws and M3 nuts to fasten it securely. This wheel provides stability and maneuverability to your robot car.
-
Wheel Mounting: Install the two wheels onto the motor shafts. If you find the wheels are too tight and restrict movement, you can loosen or remove the screws on the wheels slightly.
-
Copper Pillar Installation: Mount 4pcs of copper pillars on the lower car chassis using 4pcs of M3x10 hex screws. Similar to the motor mounts, consider adding M3 washers for a tighter fit if needed.
-
Battery Box Installation: Install the 18650 battery box onto the upper car chassis using 4pcs of M3x10 screws and M3 nuts. This battery box will house the power source for your smart robot car.
-
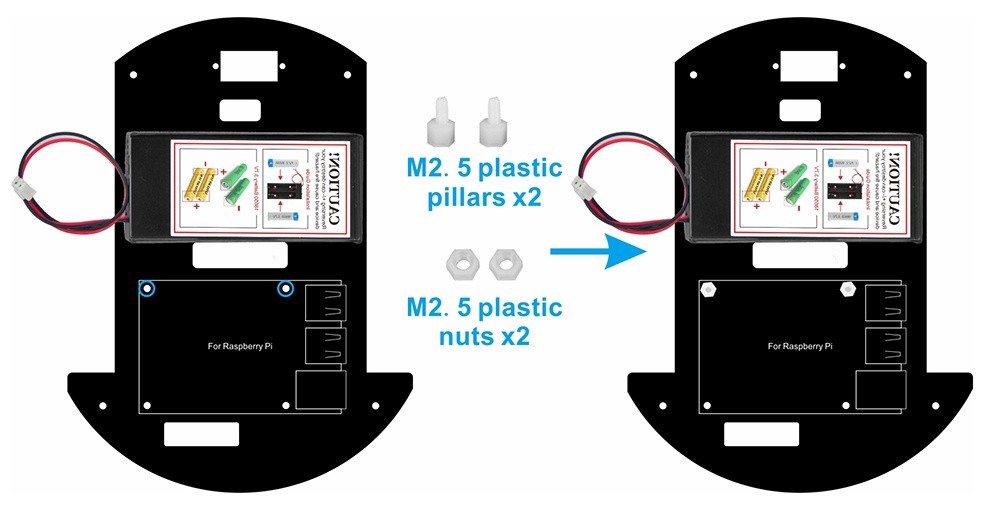
Plastic Pillar Fixation on Upper Chassis: Fix 2pcs of M2.5 plastic pillars on the upper chassis as shown in the image. These pillars will be used to mount the Raspberry Pi.
-
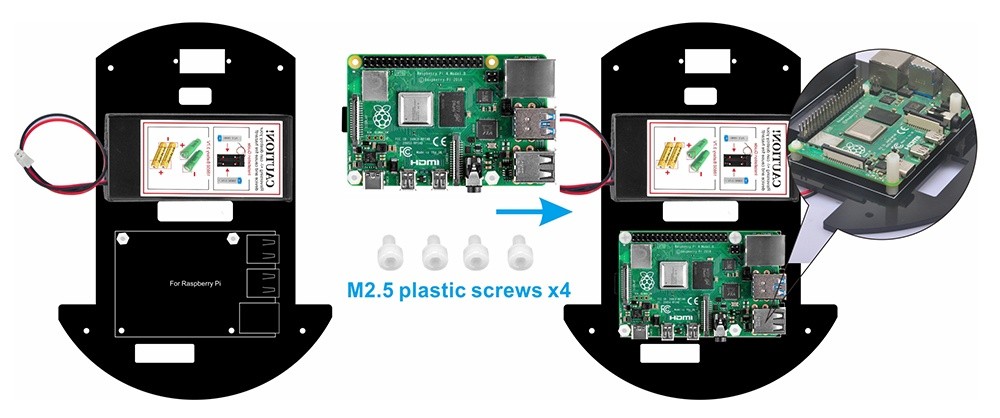
Raspberry Pi Pillar Assembly: Use an M2.5 plastic pillar to pass through the Raspberry Pi board and combine it with an M2.5*12 plastic pillar from the bottom side. This setup prepares the Raspberry Pi for mounting onto the chassis.
-
Raspberry Pi Mounting: Install 2pcs of M2.5 plastic screws from under the chassis to secure the Raspberry Pi, and another 2pcs of M2.5 plastic screws on top of the Raspberry Pi for added stability.
-
PWM HAT Insertion: Insert the OSOYOO PWM Hat onto the Raspberry Pi, aligning the pins carefully. This HAT is essential for controlling the motors and servos of your robot car.
IV. Circuit Connection
Now that the hardware is assembled, let’s connect the electronic components. Follow these steps to ensure all parts are correctly wired for optimal performance of your smart robot car programs.
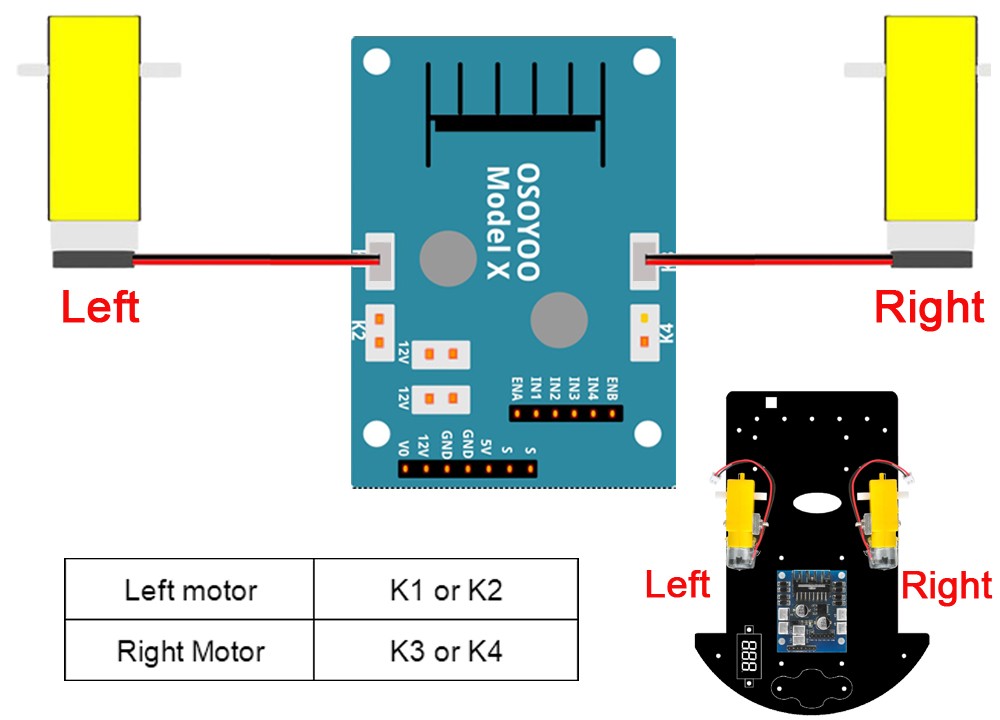
Step 1: Motor Connection: Connect the left motor to either the K1 or K2 socket on the OSOYOO Model X motor driver module, and the right motor to either the K3 or K4 socket. Refer to the diagram below for visual guidance.
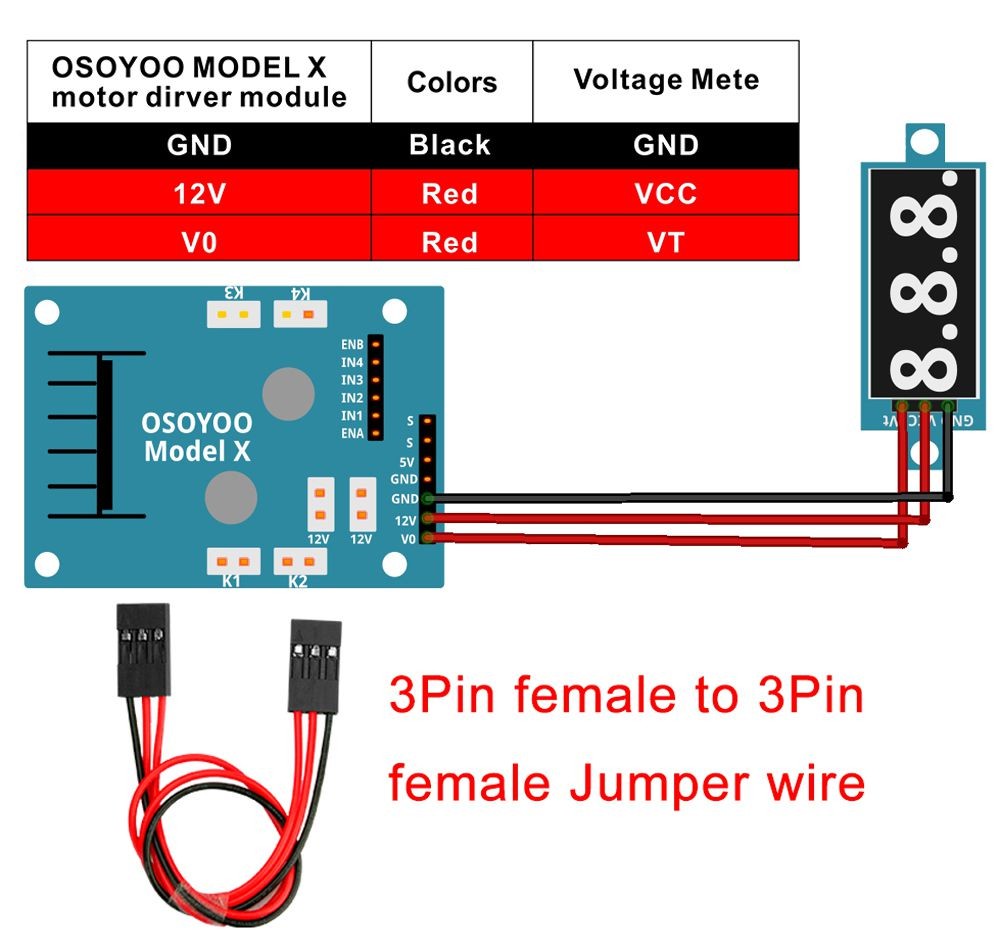
Step 2: Voltage Meter Connection: Connect the Voltage Meter to the OSOYOO MODEL X motor driver module using the 3-pin female to female jumper wires. The connection diagram below illustrates the correct wiring.
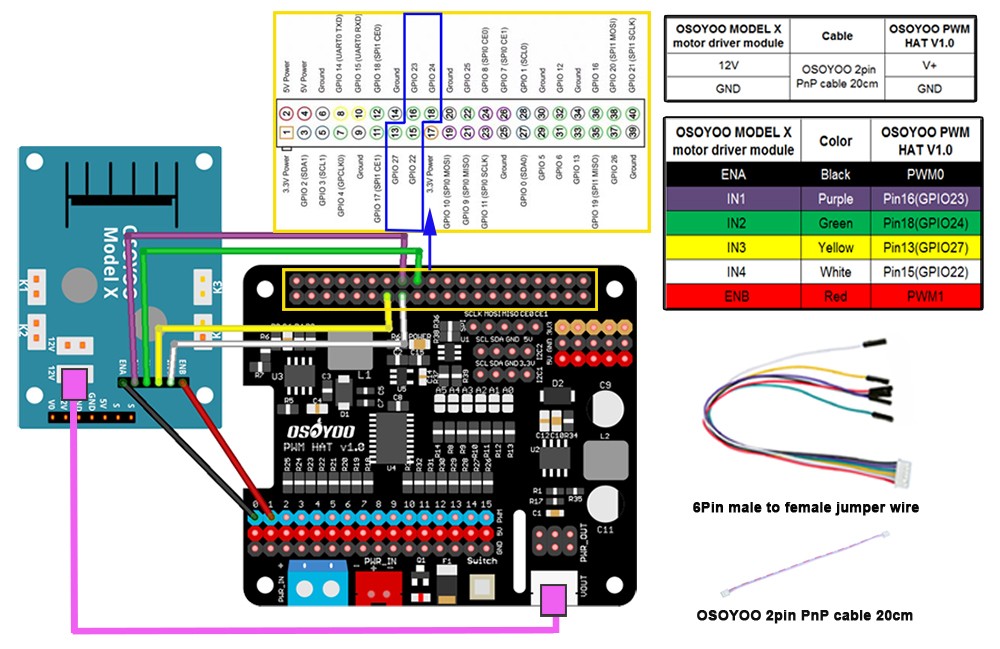
Step 3: Motor Driver and PWM HAT Connection: Connect the OSOYOO MODEL X motor driver module to the OSOYOO PWM Hat V1.0 using the 6-Pin female to female jumper wire and the 2-pin 20cm cable, as shown in the following connection diagram.
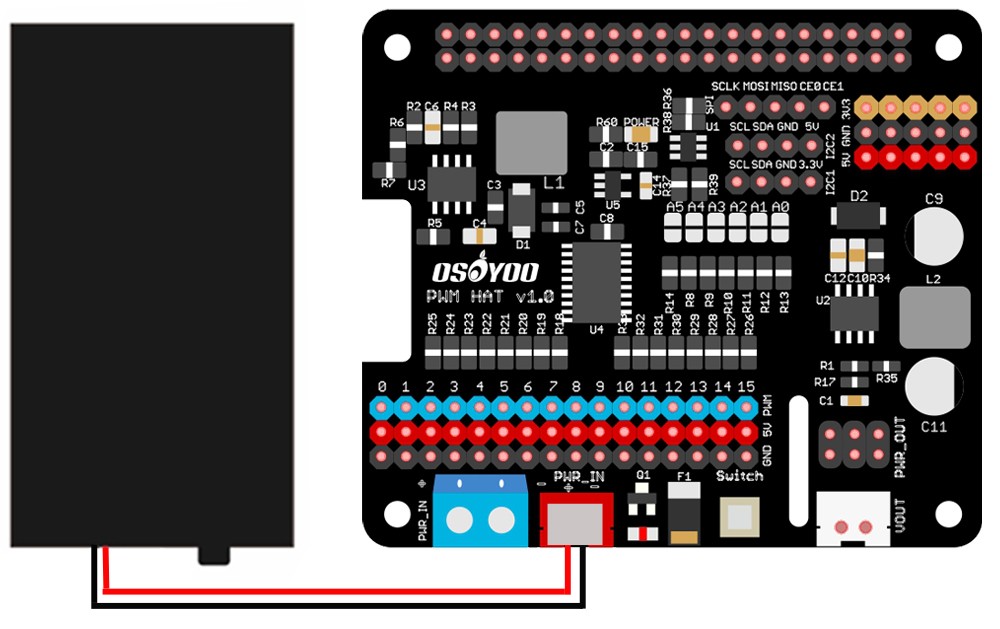
Step 4: Battery Box to PWM HAT Connection: Connect the 18650 battery box to the OSOYOO PWM Hat V1.0 as per the connection diagram below. This will supply power to the entire system.
Step 5: Chassis Assembly: Attach the upper chassis to the lower chassis using 4pcs of M3*10 hex screws and 4pcs of M3 washers to complete the physical assembly.
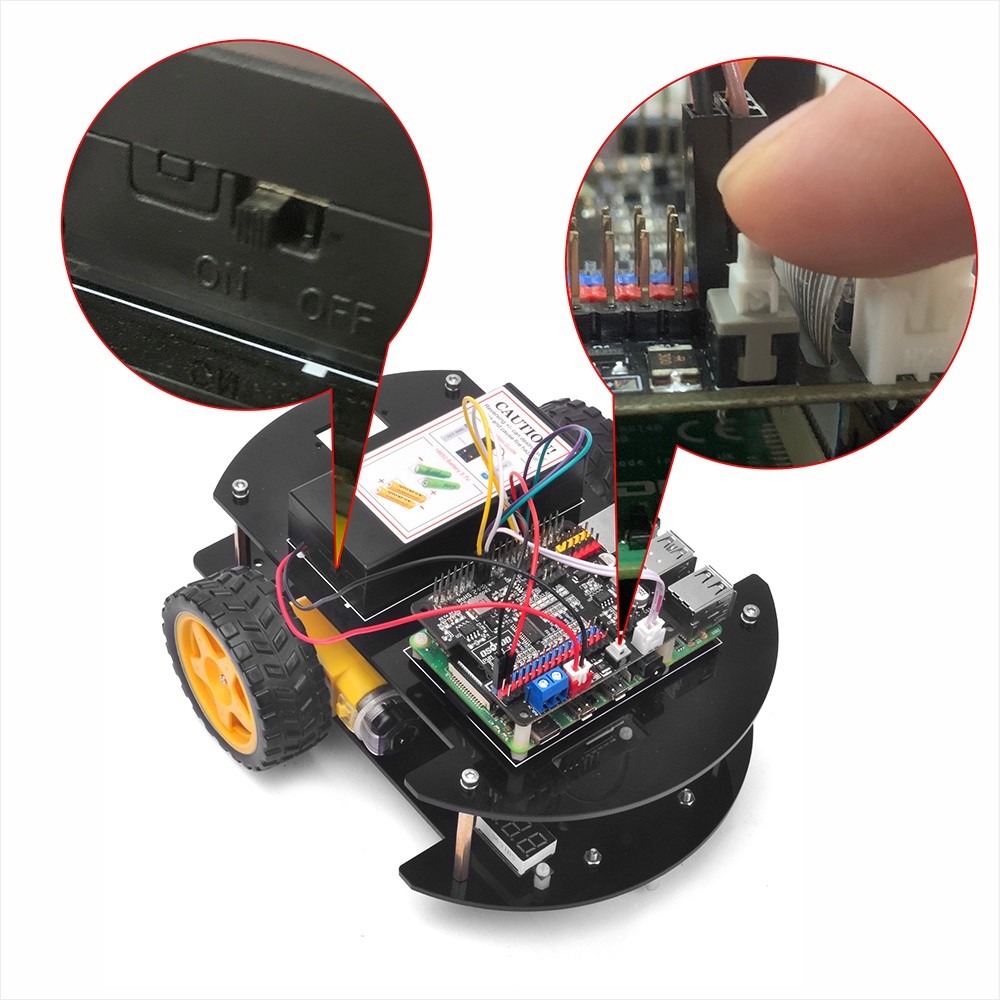
Step 6: Battery Installation: Install your 18650 batteries into the battery box. Important: Carefully check the polarity markings inside the battery box to ensure correct installation. Incorrect polarity can damage your device and pose a fire hazard.
With the hardware and circuit connections complete, we can now move on to software preparation to program your smart robot car.
V. Software Installation
To control your OSOYOO Robot Car V4.0, you need to set up the software environment on your Raspberry Pi. This involves installing the Raspberry Pi OS and necessary libraries.
| Software | Icon | Download Link |
|---|---|---|
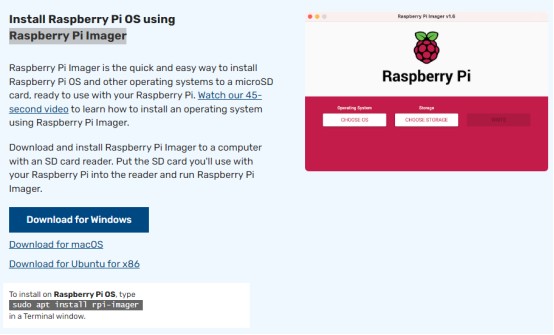
| Raspberry Pi Imager | https://www.raspberrypi.com/software/ | |
| Raspberry Pi OS | https://www.raspberrypi.com/software/operating-systems/ | |
| SSH Tool: PuTTY (for Windows) | Download PuTTY |
Operating System Compatibility: This tutorial is compatible with Raspberry Pi Legacy OS with desktop (Release date: October 22nd 2024) and BOOKWORM with desktop (Release date: November 19th 2024). For any issues with newer versions, please contact us for support.
Steps to Install Raspberry Pi OS:
Step 1: Burn Raspberry Pi OS to SD Card: Burn the Raspberry Pi OS onto a 16GB or larger SD card. If your SD card already has an OS, you may need to format it first.
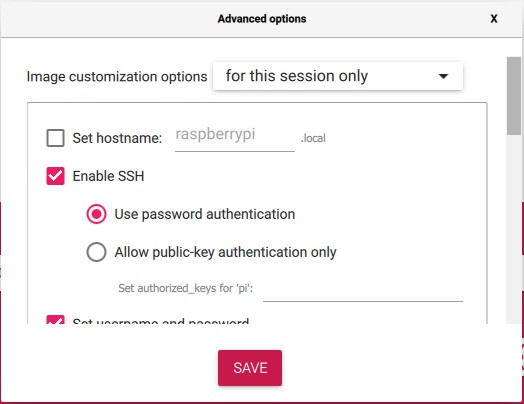
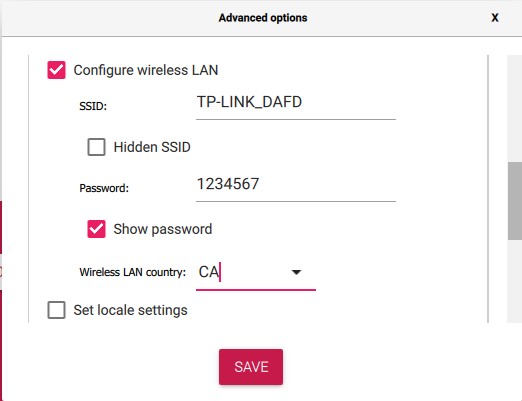
Note: During the OS writing process using Raspberry Pi Imager, enable SSH, set your desired username and password, and configure WIFI settings for remote access.
Step 2: Find Raspberry Pi IP Address:
-
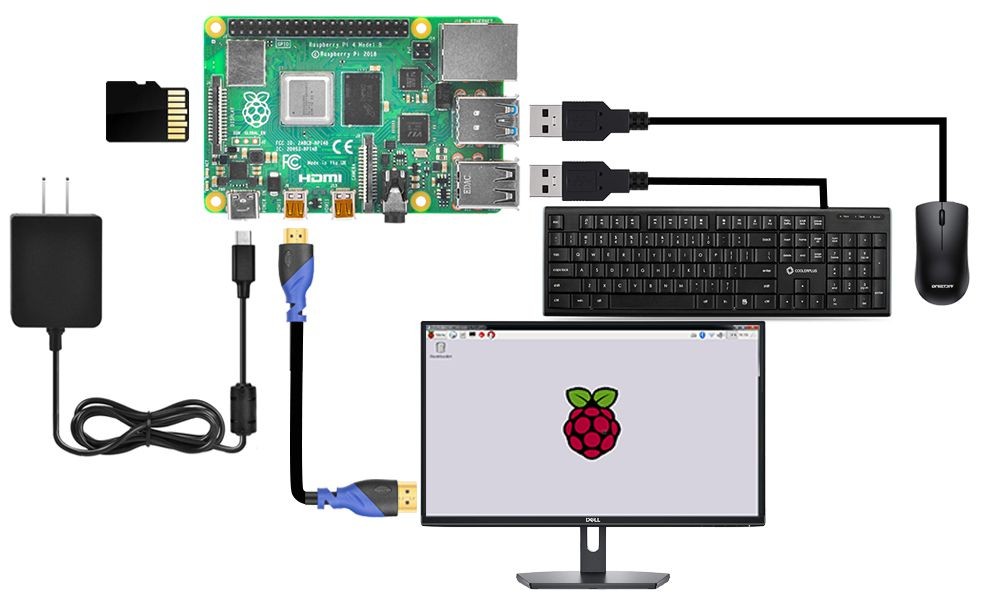
Connect your Raspberry Pi to a monitor or TV via HDMI, and attach a keyboard and mouse to the USB ports. Insert the SD card (with the OS installed) into the Raspberry Pi. (If already assembled in the robot car, the Raspberry Pi is in place).
-
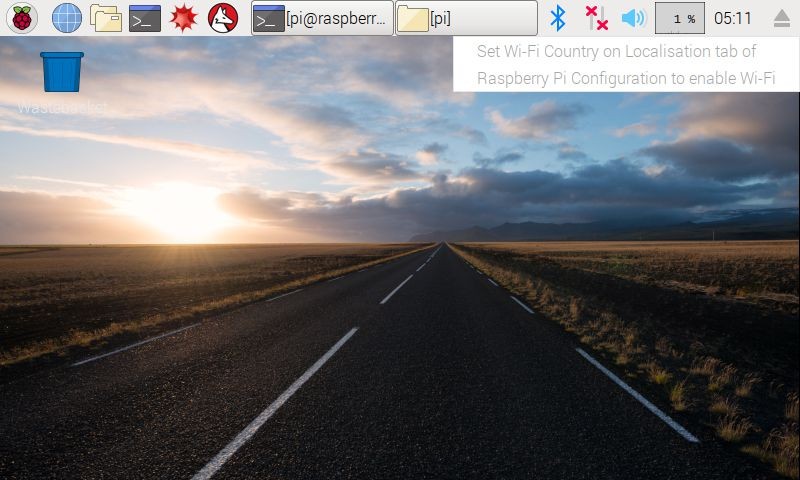
Hover over the LAN icon to check network connection status.
-
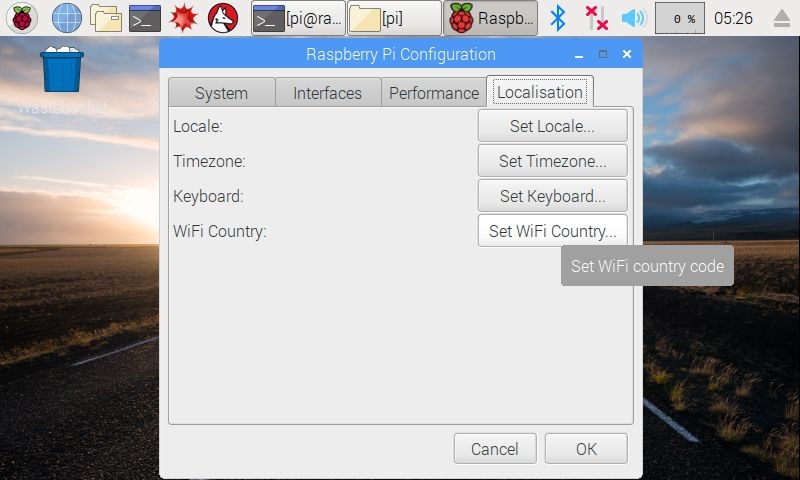
If needed, configure WIFI localization settings through the Raspberry Pi desktop interface.
-
Determine the IP address:
Method A (GUI): Connect to a monitor, click the LAN or WIFI icon on the Raspberry Pi desktop to view the IP address.
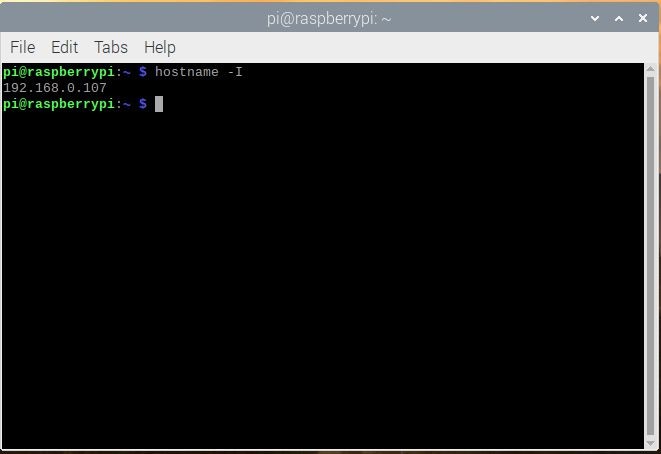
Method B (Terminal): Open the Terminal application on the Raspberry Pi and type the command:
hostname -I
Step 3: Remote Control via SSH:
Note: For detailed instructions on using SSH to remotely control your Raspberry Pi, please visit: https://osoyoo.com/2017/06/20/raspberry-pi-3-basic-tutorial/#7. In this tutorial, we use a Windows PC and PuTTY as the SSH client.
-
Ensure the Raspberry Pi with the SD card is installed on the robot car and powered off before proceeding. Then, power on the robot car.
-
Download and install PuTTY on your Windows PC from: https://www.chiark.greenend.org.uk/~sgtatham/putty/.
-
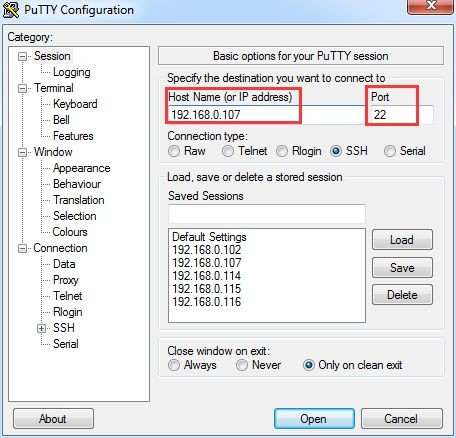
Open PuTTY and navigate to Session in the left-hand menu.
-
Enter the IP address of your Raspberry Pi in the Host Name (or IP address) field and ensure the Port is set to 22 (default SSH port). Click Open.
-
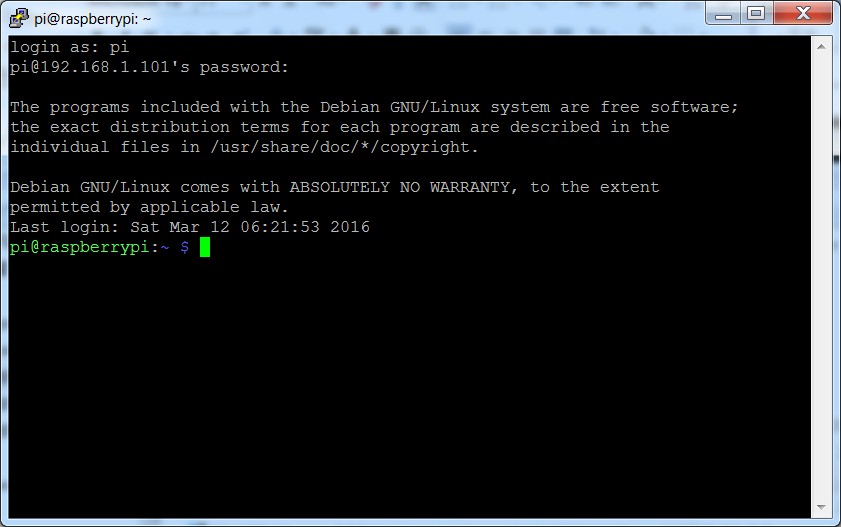
When connecting for the first time, you may see a security alert. Click Yes to proceed. At the prompt, enter the username pi and the password raspberry (default credentials if not changed). Note that password characters are not displayed during typing for security reasons. After successful login, the PuTTY terminal will display the Raspberry Pi command prompt.
For SSH access from other operating systems, refer to the detailed guide: https://osoyoo.com/2017/06/20/raspberry-pi-3-basic-tutorial/#7.
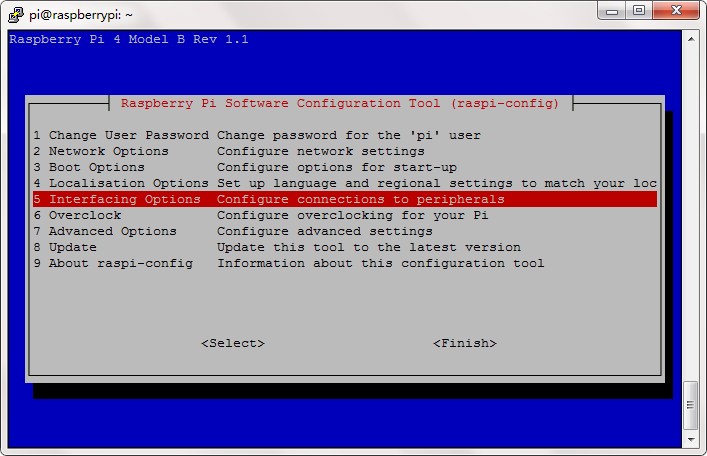
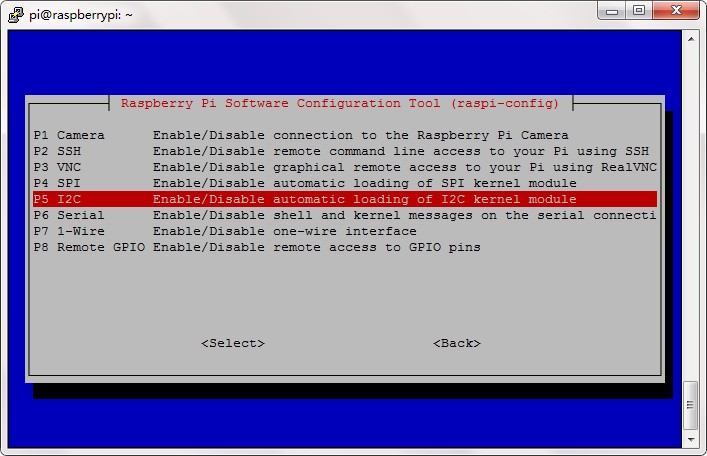
Step 4: Enable I2C:
If I2C is not enabled, use the following command in the terminal:
sudo raspi-config
Navigate to Interfacing Options -> I2C -> Yes -> Ok -> Finish to enable I2C communication, which is necessary for the PWM HAT to control motors.
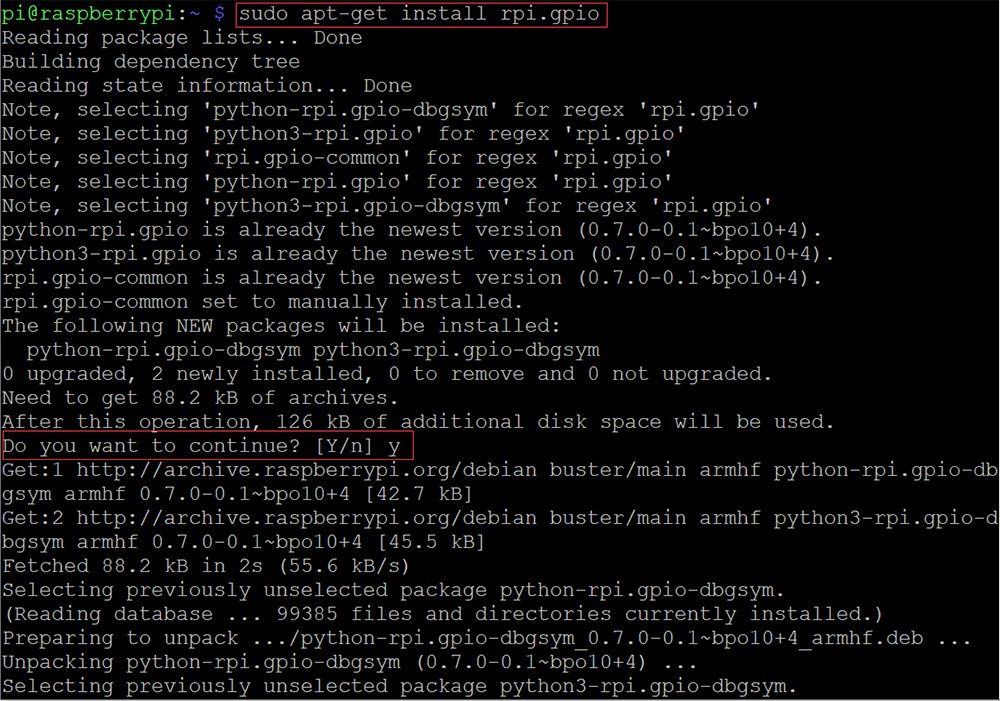
Step 5: Install GPIO Library:
Run these three commands in the terminal to update your system and install the Raspberry Pi GPIO library, which is essential for interfacing with hardware components:
sudo apt-get update
sudo apt-get upgrade
sudo apt-get install rpi.gpio
Step 6: Install PCA9685 and servokit Libraries:
Install the PCA9685 and servokit libraries, which are crucial for controlling the PWM HAT. Choose the correct command based on your Raspberry Pi OS version:
For Raspberry Pi Legacy OS:
sudo pip install adafruit-circuitpython-pca9685
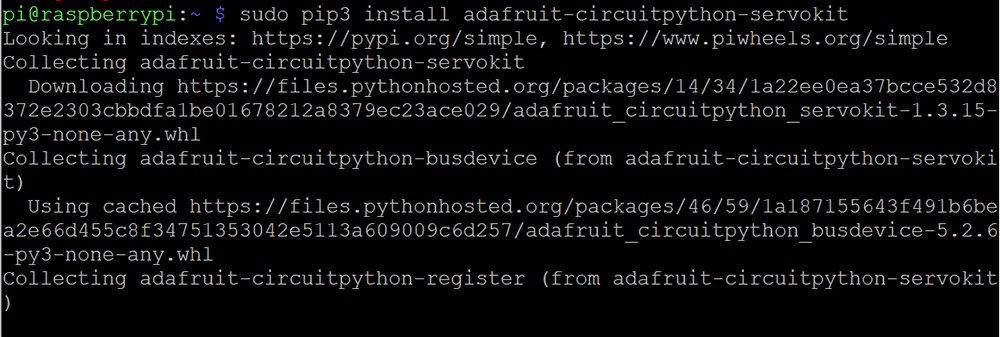
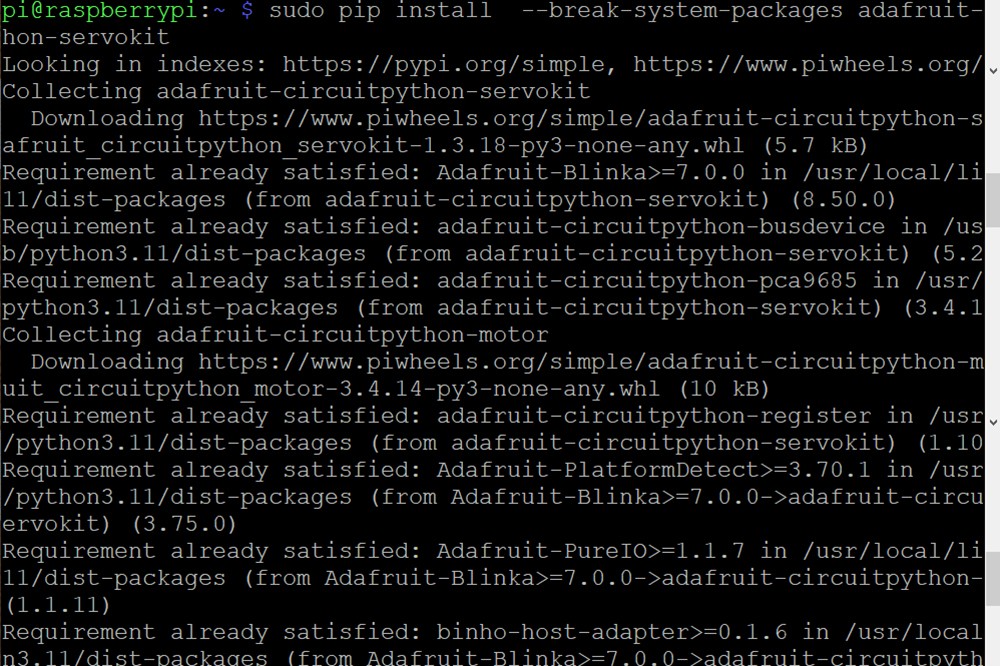
sudo pip install adafruit-circuitpython-servokitFor Raspberry Pi Bookworm OS (Raspberry Pi 4/5):
sudo pip install --break-system-packages adafruit-circuitpython-pca9685
sudo pip install --break-system-packages adafruit-circuitpython-servokit
Step 7: Download Sample Code:
Download the basic movement program sample code by running the following command in the terminal:
wget https://osoyoo.com/driver/picar/picar-basic.pyStep 8: Run Basic Movement Program:
Place your robot car on the ground and execute the basic movement Python program. Choose the command based on your Python version:
For Python 2 (Raspberry Pi 3/3B+):
python picar-basic.pyFor Python 3 (Raspberry Pi 5/4/3A+):
python3 picar-basic.pyAfter running the program, your robot car should move forward for 1 second, then backward for 1 second, turn left for 1 second, and finally turn right for 1 second before stopping. If the car does not move as expected, double-check all your wiring connections.
The sample Python code is extensively commented for easy understanding and customization. You can find the full code at http://osoyoo.com/driver/picar/picar-basic.py. With basic Python knowledge, you can easily modify this code to create your own Smart Robot Car V4.0 Programs and applications.