Understanding how to read data from EEPROM is crucial for many Arduino projects. EEPROM (Electrically Erasable Programmable Read-Only Memory) allows your Arduino to store data even when powered off, enabling functionalities like remembering settings or tracking usage. This guide delves into what EEPROM is, how to read from it using the EEPROM.read() function, and provides a practical example to solidify your understanding.
What is EEPROM and Why Use It?
Variables in your Arduino sketch are typically lost when the board loses power. EEPROM provides non-volatile memory, meaning data persists even after a power cycle or reset. This is essential for applications requiring data retention, such as:
- Remembering Settings: Store user preferences, calibration values, or device configurations.
- Data Logging: Record sensor readings, event counts, or operational data over time.
- State Restoration: Resume operation from the last known state after a power outage.
EEPROM on Arduino: Capacity and Limitations
EEPROM memory is limited and varies depending on the Arduino board. For example:
| Microcontroller | EEPROM Capacity |
|---|---|
| ATmega328 (Uno, Nano) | 1024 bytes |
| ATmega2560 (Mega) | 4096 bytes |
Each byte in EEPROM can store a value from 0 to 255. While EEPROM offers persistent storage, it has a finite lifespan. Each memory location has a limited number of write/erase cycles (typically 100,000). EEPROM.read() operations, however, do not impact its lifespan.
Reading Data from EEPROM: The EEPROM.read() Function
The Arduino IDE includes the EEPROM library, simplifying interaction with EEPROM. To read data, use the EEPROM.read() function:
#include <EEPROM.h>

byte storedValue = EEPROM.read(address);
#include <EEPROM.h>: Includes the necessary library.address: The memory location (0 to EEPROM size – 1) from which to read.storedValue: A variable to store the retrieved byte.
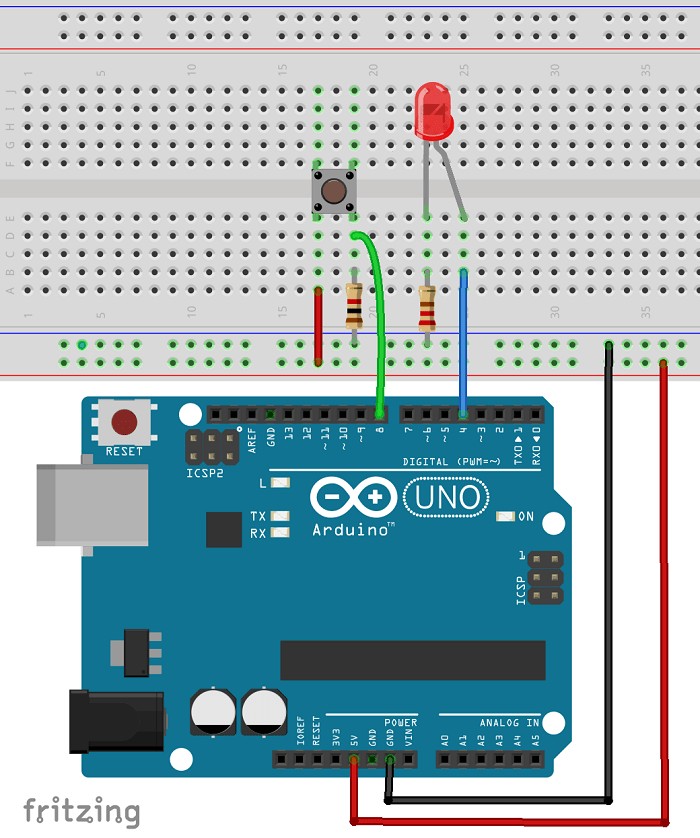
Practical Example: Remembering LED State
Let’s illustrate with a common scenario: making an Arduino remember the state of an LED even after power loss.
#include <EEPROM.h>

const int buttonPin = 8;
const int ledPin = 4;

void setup() {
  pinMode(buttonPin, INPUT);
  pinMode(ledPin, OUTPUT);

  // Read the stored LED state from EEPROM
  byte ledState = EEPROM.read(0);
  digitalWrite(ledPin, ledState);
}

void loop() {
  // ... (Button debouncing and state change logic) ...

  // Update the LED state and store it in EEPROM
  EEPROM.update(0, ledState);
}
This code snippet reads the LED state from EEPROM address 0 during setup. The EEPROM.update() function in the loop ensures the state is written to EEPROM only when it changes, preserving write cycles.
Conclusion: EEPROM Read for Persistent Data
EEPROM.read() empowers your Arduino projects with persistent memory, enabling a wide range of applications. By understanding its usage and limitations, you can leverage EEPROM to create more robust and feature-rich projects. Remember to consider the finite write/erase cycles and utilize EEPROM.update() for efficient data storage. Explore further by experimenting with the provided example and adapting it to your specific needs.