Modern vehicles offer unparalleled convenience through integrated systems like HomeLink, which allows you to control your garage door directly from your car’s rearview mirror. No more fumbling for separate remotes or worrying about lost or stolen devices. Programming your car’s mirror remote to your garage door opener is a straightforward process that enhances your daily routine. This guide provides a comprehensive, step-by-step approach to seamlessly link your car’s HomeLink system to your garage, ensuring effortless access every time.
Step-by-Step Guide to Programming Your Car Mirror Remote
Programming your car’s HomeLink system involves a series of simple steps, typically completed in minutes. Follow this detailed guide to successfully link your car mirror remote to your garage door opener.
Step 1: Positioning Your Vehicle for Programming
Begin by parking your car in close proximity to your garage door. A distance of approximately 5 feet is generally recommended to ensure a strong and reliable signal during the programming process. Positioning your vehicle correctly is the first step to a smooth setup. Whether you choose to program from inside your garage (if accessible) or from your driveway, ensure your garage door is closed initially. This will allow you to access the garage door opener unit later in the process without obstruction.
Step 2: Clearing Existing HomeLink Memory for a Fresh Start
Before programming a new garage door opener, it’s crucial to clear any previously stored settings from your car’s HomeLink system. This is particularly important if you’ve recently purchased a used vehicle, as it may still retain the garage door codes from the previous owner. Clearing the memory ensures a clean slate for programming your garage door.
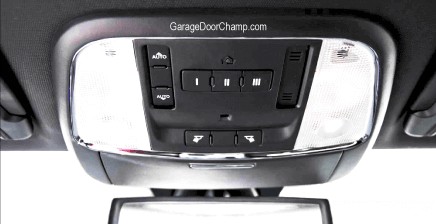
Locate the HomeLink buttons in your car. These are usually found on the rearview mirror’s underside or sometimes on the sun visor. To clear the memory, simultaneously press and hold the first and third HomeLink buttons (typically labeled #1 and #3). Keep pressing both buttons for approximately 10 to 20 seconds. Initially, the indicator LED light next to the HomeLink buttons will blink slowly. After 10 to 20 seconds, once the memory is successfully cleared, the LED light will begin to flash rapidly. In some car models, the LED might change color, often from orange to green, to indicate successful memory clearing.
To verify that the memory clearing process was successful, briefly press and hold any of the HomeLink buttons individually. If the memory is clear, the LED indicator should blink slowly, indicating that no previous programming is stored for that button.
Step 3: Programming Your Car Button with the Handheld Remote
With your car’s HomeLink memory cleared, you are ready to program a specific HomeLink button to your garage door opener. Choose any of the three HomeLink buttons to program. Ensure your car’s ignition is turned on (accessory mode is sufficient; the engine does not need to be running). You will also need your garage door’s handheld remote. Position yourself inside your car, still parked close to the garage door.
Simultaneously press and hold the button on your handheld garage door remote that you typically use to open your garage, and the HomeLink button in your car that you’ve chosen to program. Continue holding both buttons. Observe the HomeLink indicator light. It should initially flash slowly, then after about 5 seconds, it should transition to a rapid flash. This rapid flashing light indicates that the HomeLink system has successfully learned the frequency signal from your garage door remote. If you encounter any issues during this step, refer to the troubleshooting section later in this article.
Step 4: Activating the Garage Door Opener’s Learn Mode
After successfully programming a HomeLink button with your handheld remote, the next step involves activating the “learn” mode on your garage door opener unit itself. Modern garage door openers utilize rolling code technology for enhanced security, which requires this additional synchronization step.
Locate the “Learn” button on your garage door opener unit. This button is typically situated on the back panel of the opener motor unit or sometimes on the side near the antenna. The “Learn” button may also be labeled as a “Smart” button. Press and release the “Learn” button on the garage door opener. Once pressed, an indicator LED on the opener unit will illuminate. In some models, this light will remain solid, while in others, it may flash. You usually have a short window of time (typically 30 seconds) after pressing the learn button to complete the next step, so proceed promptly.
Step 5: Final Synchronization with Your Car
Immediately after pressing the “Learn” button on your garage door opener, return to your car. Press and release the HomeLink button you programmed in Step 3 for about 3 seconds, then release it. Wait for approximately one second, and then press and release the same HomeLink button again for another 3 seconds. Repeat this press-and-release sequence a third time.
During this process, your garage door opener is listening for the signal from your car’s HomeLink system. In most cases, after a few cycles of pressing the HomeLink button, your garage door should respond and begin to open or close. This movement confirms that the programming process is complete and your car’s mirror remote is now successfully synced with your garage door opener. If the garage door does not activate after several attempts, repeat steps 4 and 5, or consult the troubleshooting section for further assistance.
What Types of Cars and Garage Door Openers Are Compatible?
The HomeLink system is widely compatible with most modern vehicles. If your car is equipped with HomeLink, it is generally programmable with the vast majority of garage door openers manufactured after 1995. While the programming steps outlined above are broadly applicable, some vehicle brands, such as Audi and Tesla, may have slightly different programming procedures. In these cases, consult your vehicle’s owner’s manual for specific instructions, which often include on-screen prompts to guide you through the process. Compatibility is rarely an issue with HomeLink and modern garage door systems, ensuring a seamless integration for most users.
Troubleshooting Common Programming Issues
Encountering difficulties while programming your car mirror remote is not uncommon. Here are some troubleshooting tips to address potential issues:
- Distance Adjustment: If programming fails initially, try slightly adjusting the distance between your handheld garage door remote and your car’s rearview mirror during Step 3. A minor shift closer or further away can sometimes improve signal reception. Also, re-verify that your car is parked within approximately 5 feet of the garage door.
- External Receiver: If your garage door system uses an external receiver, ensure you are programming your car to the receiver unit, not directly to the garage door opener motor itself. The programming steps remain the same.
- Yellow Learn Button and Compatibility Bridge: Garage door openers from brands like Liftmaster, Chamberlain, and Craftsman that feature a yellow “Learn” button may have compatibility issues with cars manufactured before 2013. These older vehicles may not be directly programmable with these newer openers. In such cases, you will likely need to purchase a HomeLink compatibility bridge (or repeater). Program your car to this repeater following the standard instructions, and the repeater will then communicate with your garage door opener.
- Repeat the Process: Sometimes, simply repeating the programming steps from the beginning can resolve intermittent issues. Carefully go through each step again to ensure no step was missed or performed incorrectly.
- Check Batteries: Low batteries in your handheld garage door remote can weaken the signal and hinder programming. Replace the batteries in your remote and try the programming process again.
- Ignition Switch: Double-check that your car’s ignition switch is in the “On” or “Accessory” position during programming.
- System Malfunctions: If all troubleshooting steps fail, it’s possible there may be a fault within your car’s HomeLink system or the garage door opener. In rare cases, the opener’s circuit board or receiver may be defective. If you suspect a system malfunction, consider contacting a certified garage door repair service for professional diagnosis and repair.
- Consult Owner’s Manual: Your vehicle’s owner’s manual is a valuable resource. It may contain specific instructions or troubleshooting advice tailored to your car’s HomeLink system and model.
Frequently Asked Questions (FAQs)
Can you program your car without a remote control?
No, unfortunately, you need a working handheld remote for your garage door opener to program your car’s HomeLink system. The HomeLink system learns the signal from your existing remote.
What should I do if my car won’t program to the garage door?
First, review the troubleshooting tips provided above. Check compatibility, distance, batteries, and consider the possibility of needing a compatibility bridge for certain garage door opener models. If issues persist, consult your vehicle owner’s manual or contact a qualified garage door repair technician.
How far does the car need to be from the garage door when programming?
For optimal signal strength during programming, position your car approximately 5 feet or closer to the garage door. This close proximity ensures reliable communication between your car, the handheld remote, and the garage door opener.
By following these detailed steps and troubleshooting tips, you should be able to successfully program your car mirror remote to control your garage door, adding a layer of convenience and security to your daily life.