A common issue in Jeep Grand Cherokees is a malfunctioning blend door actuator gear, leading to inconsistent cabin temperatures. This often expensive repair can be tackled with a DIY approach, saving hundreds of dollars. This guide details a successful repair on a 2012 Jeep Grand Cherokee, providing insights and tips for those facing a similar challenge.
Understanding the Blend Door Actuator Gear Problem
The blend door controls the mix of hot and cold air entering the cabin. The actuator gear, a small plastic component, moves the blend door based on temperature settings. A common failure point is the blend door seal melting and sticking, preventing the actuator gear from properly positioning the blend door. This results in one side of the vehicle blowing hot air while the other blows cold. Simply replacing the actuator without addressing the underlying seal issue often leads to a recurring problem.
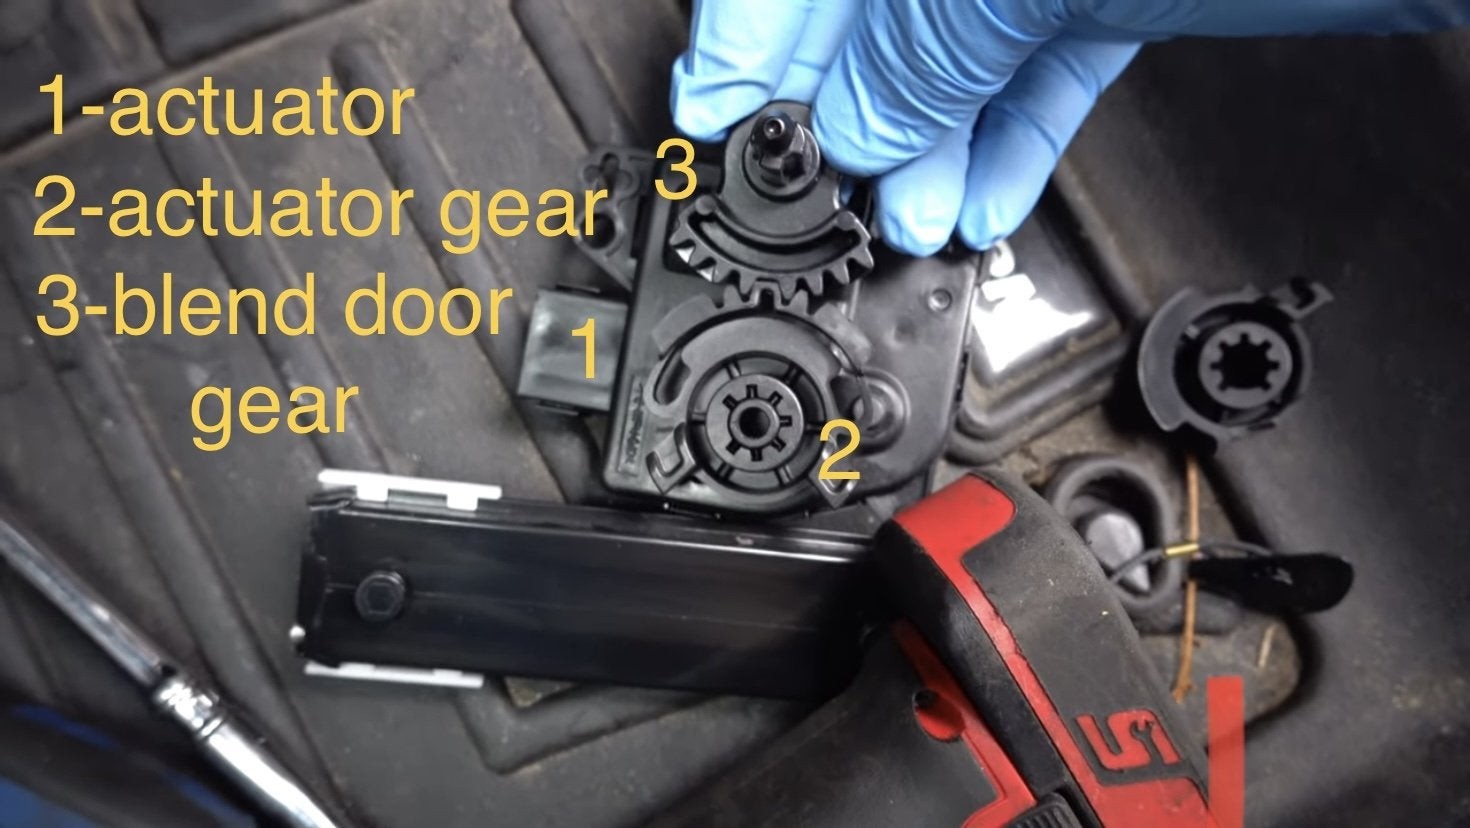
This image illustrates the blend door gear (3) and its interaction with the actuator gear (2). Proper alignment of these gears is crucial for correct blend door operation. Note the single large tooth on the actuator gear, which must engage with the corresponding notch on the blend door gear.
A Cost-Effective Solution: The Screw Trick
A simple yet effective solution involves drilling a small screw into the actuator gear. This prevents the blend door from reaching its extreme position, thus avoiding contact with the melted seal. This fix, as demonstrated by “Alex the Mechanic” on YouTube, can prevent a costly HVAC box replacement.
Step-by-Step Repair Process
This repair was successfully completed following a guide by “Stay on the Gas” on YouTube, with additional insights and observations.
Disassembly:
-
Disconnect the battery: This crucial step prevents accidental airbag deployment and allows the HVAC system to recalibrate. Remember to move the driver’s seat all the way back before disconnecting the battery for easier access.
-
Partial Dash Removal: For a larger individual, partial disassembly of the dash significantly improves access. This includes removing the kick panel, the plate behind it, the right-side bracket, and the floor vent.
- Floor Vent Removal: The top section of the floor vent can be removed by squeezing in the middle, separating it into two halves.
This picture shows the separated halves of the upper floor vent. Knowing this is removable makes reassembly much simpler.
- Floor Vent Removal: The top section of the floor vent can be removed by squeezing in the middle, separating it into two halves.
-
Actuator Removal: Remove the two T-20 screws holding the actuator in place. A mini ratchet set can be helpful in this tight space.
Actuator Alignment (If Reusing):
- Test with 9V Battery: Connect a 9V battery to the actuator prongs to observe the gear movement. Reverse the polarity to change direction.
- Align the Gear: Stop the gear when the gapped section aligns with the arrow on the actuator (if present). This ensures correct positioning when reinstalling.
This image demonstrates aligning a Dorman actuator using the alignment arrow and a 9V battery.
Reassembly:
- Reconnect Actuator Gear: Carefully align and reconnect the actuator gear to the blend door gear. There’s only one way they fit together.
- Reinstall Actuator: Secure the actuator with the T-20 screws.
- Reassemble Floor Vent: Snap the two halves of the upper floor vent back together.
This image highlights how the floor vent connects to the HVAC box, aiding in reassembly. - Reattach Hood Release Cable: Reattaching this cable can be tricky. Insert the cable from the back, parallel to its slot, then secure it with the silver peg using a screwdriver or punch.
This image illustrates the proper method for reattaching the hood release cable. - Reassemble Dash: Reinstall all removed dash components in reverse order.
- Reconnect Battery: Reconnect the battery ground cable. The HVAC system will recalibrate automatically.
Conclusion
This DIY repair successfully restored proper climate control functionality to the Jeep Grand Cherokee. By addressing the root cause—the sticking blend door seal—and utilizing the screw trick, a potentially expensive repair was avoided. While this guide focuses on a 2012 model, the principles and techniques may apply to other Jeep Grand Cherokees experiencing similar issues. Always consult your vehicle’s repair manual and exercise caution when working on automotive systems.