The Nexiq USB Link 2 is a vital tool for vehicle diagnostics, offering faster speeds and increased memory compared to its predecessors. To utilize its full potential, however, you’ll need the correct Nexiq Usb Link 2 Driver Download. This comprehensive guide provides step-by-step instructions for downloading and installing the necessary drivers, ensuring seamless communication between your PC and the USB Link 2.
 install USB-Link 2 driver
What is the Nexiq USB Link 2?
The Nexiq USB Link 2 is a powerful vehicle communication interface adapter that allows you to retrieve vehicle information and perform diagnostics using specific PC applications. It boasts significantly improved performance over older models, with five times the speed and sixteen times the memory. This enhanced capability allows for heavier bus loads on simultaneous channels, providing a more robust and efficient diagnostic experience. The USB Link 2 offers both wired (USB) and wireless (Bluetooth) connection options for flexible communication with your PC.
Manual Nexiq USB Link 2 Driver Download and Installation
Downloading and installing the Nexiq USB Link 2 driver manually is a straightforward process. Follow these steps to ensure a successful installation:
Step-by-Step Download Instructions:
-
Visit the Official Nexiq Website: Navigate to the official Nexiq website (https://www.nexiq.com/).
-
Locate the Driver Download Section: Scroll down the page and find the “Download A Driver” section or a similar link for driver downloads.
-
Select USB Link 2 Drivers: Choose the appropriate “USB-Link 2 Drivers” option, ensuring you select the correct version for your operating system (Windows 7, 8, or 10) and connection type (USB or Bluetooth). Look for the latest version for optimal performance.
-
Initiate the Download: Click the “Download” button to begin downloading the driver installation file (usually an .exe file).
Step-by-Step Installation Instructions:
-
Run the Installer: Locate the downloaded .exe file and double-click it to run the installer.
-
User Account Control: If prompted by User Account Control, click “Yes” to allow the installer to make changes to your system.
-
Accept the License Agreement: Carefully read the license agreement and click “I Agree” to proceed with the installation.
-
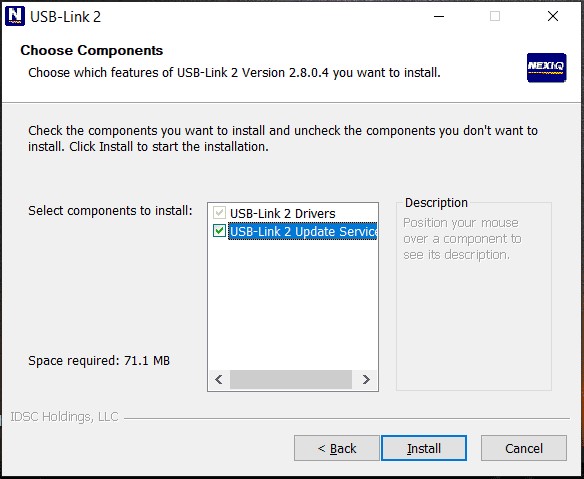
Select Components: Choose the components you want to install. In most cases, selecting the default options is recommended. If Device Tester is not included, ensure it is selected for comprehensive functionality.
-
Complete the Installation: Click “Install” and follow the on-screen prompts to complete the installation process.
Automatic Nexiq USB Link 2 Driver Update
While manual installation is reliable, automating the process can save time and effort. Utilizing a driver update tool simplifies the Nexiq USB link 2 driver download and ensures you always have the latest version.
-
Choose a Driver Update Tool: Select a reputable driver update tool such as Driver Booster, AVG Driver Updater, DriverMax, or Driver Easy. Download and install the chosen tool on your PC.
-
Scan for Drivers: Launch the driver update program. It will automatically scan your system and identify outdated or missing drivers, including the Nexiq USB Link 2 driver.
-
Update Drivers: Follow the on-screen instructions to update the identified drivers. The tool will download and install the latest versions automatically.
Alternatively, you can update the driver through Windows Device Manager. Open Device Manager, locate the Nexiq device, right-click on it, and choose “Update driver.”
Conclusion
Having the correct Nexiq USB Link 2 driver is crucial for effective vehicle diagnostics. This guide provides clear instructions for both manual and automatic driver downloads and installations. By following these steps, you can ensure your Nexiq USB Link 2 functions optimally, providing accurate and reliable diagnostic information. Remember to always download drivers from official sources or trusted driver update tools to maintain system security and stability.