A common issue with older Renault Clios, and indeed many cars, is a failing central locking system. Key fobs become unreliable, and the original system can malfunction. A cost-effective solution is to install an aftermarket keyless entry system. This guide provides a step-by-step installation process, using a Renault Master (2002) as an example, demonstrating the general principles applicable to many Renault models, including the Clio. While wire colors may vary slightly between models and years, the core connections remain the same.
Understanding the Keyless Entry System
Before starting, familiarize yourself with the keyless entry kit components. The kit typically includes a receiver unit, two remotes, and wiring harnesses. The receiver interprets signals from the remote and activates the car’s locking mechanisms.
Connecting to the Central Locking Button
This installation method taps into the car’s existing central locking button wiring.
-
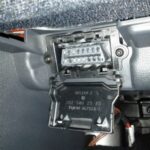
Accessing the Wiring: Remove the interior roof panel to expose the central locking button wiring. You’ll find two sets of contacts. Do not disconnect these from the panel.
-
Power Connections:
- Red Wire (+12V): Connect the red wire from the keyless receiver to the red wire on the mini connector within the interior light panel. Simply insert the wire into the same connector hole as the existing red wire; no soldering is required.
- Black Wire (Ground): Similarly, connect the black wire from the receiver to the black wire on the mini connector.
-
Locking and Unlocking Functions:
- White Wire (Locking): Connect the white wire from the receiver to the grey wire on the central locking button connector. Again, insert the wire into the same connector hole.
- White/Black Wire (Unlocking): Connect the white/black wire from the receiver to the orange wire on the central locking button connector.
- Yellow and Yellow/Black Wires (+12V for Locking Relay): Connect both the yellow and yellow/black wires from the receiver to the blue wire on the central locking button connector.
-
Light Confirmation (Optional): The two brown wires from the receiver control the car’s directional lights to provide visual confirmation of locking and unlocking. These will be connected later.
Wiring the Light Confirmation
For visual feedback, connect the brown wires to the hazard warning light switch.
-
Accessing the Hazard Switch: Locate the hazard warning light button, typically on the dashboard. On a Renault Master (2002), it’s to the left of the radio. Remove the button panel carefully using a plastic trim removal tool to avoid damage.
-
Connecting the Brown Wires:
- Brown Wire (Locking Confirmation – 1 Blink): Connect one brown wire to the green wire on the hazard switch connector.
- Brown Wire (Unlocking Confirmation – 2 Blinks): Connect the other brown wire to the small white wire on the hazard switch connector.
-
Testing and Adjustment: Test the system. If the blinking pattern is incorrect (e.g., one blink for unlock, two for lock), swap the brown wire connections. Reassemble the hazard button panel.
Finalizing the Installation
-
LED Indicator (Optional): The keyless entry kit may include an LED indicator light. Drill a small hole in a suitable location (e.g., the roof panel) and mount the LED. This provides a visual deterrent to potential thieves.
-
Receiver Placement: Secure the receiver unit inside the roof panel, allowing the antenna to hang down for optimal signal reception. Reinstall the interior roof panel.
A typical keyless entry system receiver unit.
This guide offers a general approach. Always consult your keyless entry system’s specific instructions for detailed wiring diagrams and any model-specific variations. This modification can revive your Renault Clio’s central locking, offering convenience and peace of mind. While this example uses a Renault Master, the principles apply to many vehicles, including the Renault Clio, though specific wire colors might differ. Remember to double-check your car’s wiring diagram before making any connections.