If standard antivirus scans fail to eliminate malware from your PC, Avast Rescue Disc provides a powerful solution. This bootable tool scans your system in a pre-boot environment, neutralizing malware before it can interfere with the scanning process. This guide provides a comprehensive walkthrough on creating, using, and maximizing the effectiveness of Avast Rescue Disc.
Creating Your Avast Rescue Disc
Before you begin, you’ll need:
- A malware-free PC: This computer must have Avast Antivirus installed and will be used to create the Rescue Disc.
- A blank USB drive (2GB or larger) or a blank DVD: Choose the media you prefer for the Rescue Disc. If using a DVD, ensure you have a DVD writer and burning software capable of handling ISO files.
Steps to Create Avast Rescue Disc:
- Open Avast Antivirus: Launch Avast on your clean PC and navigate to
Protection->Virus Scans. - Select Rescue Disc: Click on the
Rescue Disctab. - Choose UEFI or BIOS:
- UEFI: Select
Use UEFI boot file for modern PCsif your infected computer uses UEFI (common in PCs manufactured after 2005). - BIOS: Leave the box unchecked for older PCs with BIOS. If unsure, consult your PC’s documentation or create both versions and test each.
- UEFI: Select
- Create on USB (for USB drive): Insert your USB drive, select
Create on USB, and choose your drive from the dialog box. A progress bar will track the creation process. ClickOKwhen finished. - Create ISO File (for DVD): Select
Create ISO fileand choose a save location. After the ISO is created, clickOpen folder with ISO file. Right-click the ISO, selectBurn disc image(orShow more options->Burn disc imageon Windows 11). Choose your DVD writer and clickBurn.
Booting Your PC with Avast Rescue Disc
- Insert the Rescue Disc: Connect the USB drive or insert the DVD into the infected PC.
- Access the Boot Menu: Turn on (or restart) the PC and immediately press the key to enter the Boot Menu. This key varies depending on the manufacturer (commonly Esc, F12, F11, but can also be F10, F9, F8, or F5). Look for instructions on the BIOS boot screen.
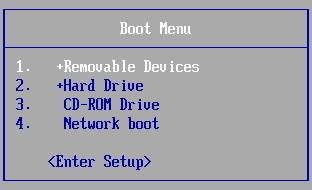
- Select the Rescue Disc: Choose your USB drive (often listed as “Removable Devices” or similar) or DVD drive (“CD-ROM Drive” or similar) from the Boot Menu.
- Follow the Prompts: Follow the on-screen instructions to boot from the Rescue Disc.
Scanning and Removing Malware
- Launch AvastPE Antivirus: Click the AvastPE Antivirus tile on the Rescue Disc menu.
- Update Virus Definitions: If connected to the internet, click
Update VPSfor the latest definitions.
- Start the Scan: Choose to scan
All hard disksorSelected folders/disks. Optionally, enableScan all archivesto include compressed files. ClickNextto begin.
- Review Results: After the scan, examine the report for detected threats.
Repairing or Deleting Infected Files
- Automatic Fix: Click
Fix automaticallyto attempt repair. Unrepairable files will be deleted.
- Manual Fix: Click
Fix manually, select files, and chooseFix automatically,Repair selected, orDelete selected.
- Restart: Once finished, click
Finishand thenFile->Restartfrom the main menu. Remove the Rescue Disc after your PC restarts.
Avast Rescue Disc offers a powerful way to combat stubborn malware. By following this guide, you can effectively utilize this tool to restore your PC’s health. For more information on Avast antivirus solutions, refer to the Avast website.