The Smok Alien 220W mod was a popular choice for vapers, but like any electronic device, it occasionally requires firmware updates. This guide provides a comprehensive walkthrough on how to upgrade your Smok Alien mod using the Smok Tool, ensuring optimal performance and access to the latest features.
Before you begin, it’s crucial to identify which version of the Smok Alien you possess. There are two versions:
- Version A: Displays “V1.x.x” (e.g., V1.3.2) upon powering on.
- Version B: Displays “VB1.x.x” (e.g., VB1.0.2) upon powering on.
Using the incorrect firmware can damage your device, so double-check before proceeding. This guide primarily focuses on Version A, using the Smok Tool for the V1.3.2 update.
Preparing for the Smok Alien Firmware Upgrade
Gather the following items before starting the upgrade process:
- Smok Alien Mod: Ensure it’s fully charged.
- Factory Micro USB Cable: Use the cable that came with your device or a high-quality data transfer cable.
- Windows Computer: The Smok Tool is compatible with Windows XP, 7, 8, and 10. Mac OS is not supported.
- Smok Alien Upgrade Tool: Download the correct version of the Smok Tool corresponding to your Alien mod version. Download links are provided below:
- Alien Upgrade Tool (v1.3.2) (For V version Alien)
- Alien Upgrade Tool (v1.2.11) (For V version Alien Mod)
- VB1.0.2 Firmware (For VB version Alien Mod)
Step-by-Step Guide to Using the Smok Tool
Follow these instructions carefully to successfully upgrade your Smok Alien mod:
-
Remove the Battery: Important: Take out the battery from your Smok Alien mod before connecting it to your computer.
-
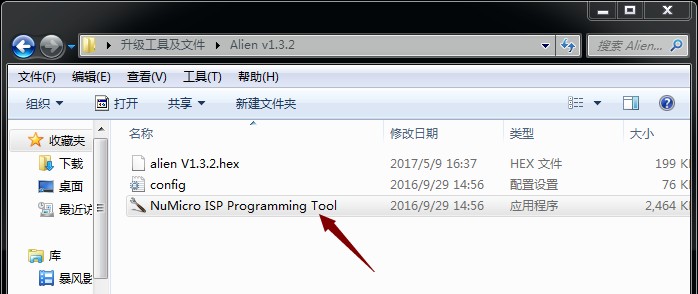
Extract the Smok Tool: Unzip the downloaded Smok Tool file to a folder on your computer.
-
Open the ISP Tool: Locate the ISP tool executable file within the extracted folder and open it.
-
Connect Your Smok Alien: While holding down the fire button on your mod, connect it to your computer using the Micro USB cable. Keep holding the fire button throughout the entire upgrade process.
-
Establish Connection: In the ISP tool, click the “Connect” icon. The icon will change to “Disconnect” once a successful connection is established.
-
Load the Firmware (BIN) File: Click “APROM” and select the appropriate BIN file from the extracted Smok Tool folder.
-
Begin the Upgrade: Check both the “APROM” and “Config” boxes, then click “Start” to initiate the firmware upgrade.
-
Confirmation: A “PASS” message will appear upon successful completion of the upgrade. Disconnect your Smok Alien and reinsert the battery.
By following these steps, you can effectively use the Smok Tool to update your Smok Alien mod, ensuring its continued performance and functionality. Remember to always double-check your device version and download the corresponding firmware to avoid any issues.