The Xprog programmer is a crucial tool for automotive diagnostics and repair, especially when dealing with modules like the FRM (Footwell Module) in BMW vehicles. While genuine XPROG devices are expensive, Chinese clones offer a more affordable alternative. However, these clones often come with limitations, including region locking and outdated firmware. This guide provides a step-by-step solution to revive a locked Chinese XPROG clone, enabling it to function correctly.
Understanding the Challenge of Cloned XPROG Devices
Chinese XPROG clones are often locked to a specific region, requiring communication with the vendor for software activation. This dependency becomes problematic when vendors cease support, leaving users with a non-functional tool. This guide outlines a process to bypass this limitation by downgrading the firmware to a readily available and unlocked version, specifically 5.5.1. This version offers stability and compatibility for tasks like FRM repair, avoiding the instability of 5.5.5 and certificate issues of 5.7.4.
Preparing for the XPROG Firmware Update
Before proceeding with the firmware update, you’ll need specific tools and software:
- USBASP Programmer: A readily available and inexpensive Atmel programmer. Purchasing a two-pack is recommended for updating the USBASP firmware itself, as explained below.
- Updated USBASP Firmware: Most USBASP programmers come with outdated firmware. Download the latest version from https://www.fischl.de/usbasp/.
- AVRDUDE or AVRDUDESS: Software for programming the Atmel microcontroller. AVRDUDE is a command-line tool, while AVRDUDESS offers a graphical user interface.
- XPROG 5.5.1 Firmware: This specific version is chosen for its stability and compatibility. Download it from a reliable source. (A sample source is provided in the original article.)
- Soldering Equipment: Required for attaching pin headers to the USBASP and XPROG.
- 10-Pin Female-to-Female Jumper Cable: Used to connect the USBASP to the XPROG.
- Virtual Machine (VM) Software: Recommended for installing the XPROG software in an isolated environment. VMWare Workstation is used in this example.
Step-by-Step XPROG Revival Process
1. Update the USBASP Firmware
Connect two USBASPs together using a 10-wire cable after soldering a pin header onto JP2 of one USBASP. Execute the following command in AVRDUDE to flash the updated firmware: avrdude.exe -c usbasp -p m8 -U flash:w:usbasp.atmega8.2011-05-28.hex:i. An initial “sck cannot be set” error is expected and will be resolved after the update.
2. Connect the USBASP and XPROG
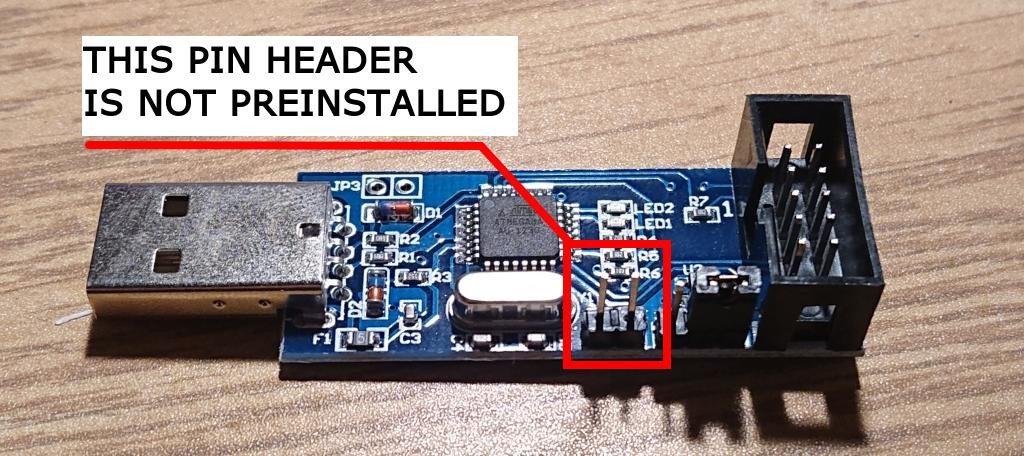
Open the XPROG casing and solder a pin header to the designated 11 pins. Using the 10-pin cable, connect the USBASP to the XPROG, ensuring correct alignment of Power, Ground, MISO, MOSI, RESET, and SCK pins. Double-check all connections.
3. Flash the XPROG
Open AVRDUDESS, detect the ATmega64 chip within the XPROG, and load the atmega flash.bin and eep.bin files. Set the fuses and lock bits to the specified values (L=0x2F, H=0xCA, E=0xFF, LB=0xFC). Execute the programming command. Expected errors regarding lock fuse and verification failure indicate a successful process.
4. Install XPROG Software in a VM
Create a Windows 7 x64 VM, avoiding VM driver installation. Install Adobe Acrobat Reader (a Chinese version might be necessary). Install the XPROG 5.5.1 drivers manually via Device Manager. Modify the VM’s VMX file to bypass VM detection (refer to the original article for specific lines). Update the XPROG firmware within the VM software after installation.
5. Connect and Program the FRM
Solder wires to the FRM’s test points, potentially using a daughterboard for easier connection. In the XPROG software, select the correct device (MC9S12XEQ384_D-FLASH). Read the D-FLASH contents and save the file. Use external tools to repair the EEPROM (e.g., tomvleeuwen’s app). Erase, write, and verify the corrected EEPROM to the FRM, repeating as needed until verification succeeds.
Conclusion
This guide successfully demonstrates the revival of a locked Chinese XPROG clone, making it a functional tool for automotive tasks like FRM repair. By following these steps, users can unlock the full potential of their XPROG clone, saving significant costs compared to purchasing a genuine device. Remember to exercise caution when working with electronics and ensure proper grounding to avoid damage.